Showing posts with label Yeast. Show all posts

Monday, April 9, 2012

Whole Wheat Focaccia


I am trying out a lot of whole wheat baking for my little family. I did not get around to take pictures of most of it, but from now onward I promise you that I will try to keep a record of recipe and pictures to share with you all. I really enjoyed baking this bread and sharing with my family.They even commented that this tastes better than this classic Focaccia I often bake.The lil guy was keeping on coming back to kitchen to snack on this. I must tell you that he is such a picky eater when it comes to cakes and bakes !


Friday, May 13, 2011

Herbed Focaccia

"Mamma Mamma,I broke my hair". Little M was trying to grab my attention by pulling my trousers and I looked down saying "oh, it's ok! How did you break the hair? What happened?" Lil M looked at me confused as if he was wondering why his mother was not taking him seriously. He persisted and explained how he pulled his hair. But what made my jaw drop is when he said " I need to see a doctor". "What!" I thought in my head, but trying hard hard not to crack up said, "It's ok buddy!. You don't need to see a doctor if you broke a hair. It is fine". He looked evern more perplexed with my calm and dolefully said "Ok, so can I have a Bandaid then?" This time I couldn't stop laughing out loud. Now, you help me understand, am I dealing with a dumb or a smart boy at home?

Herbed Focaccia


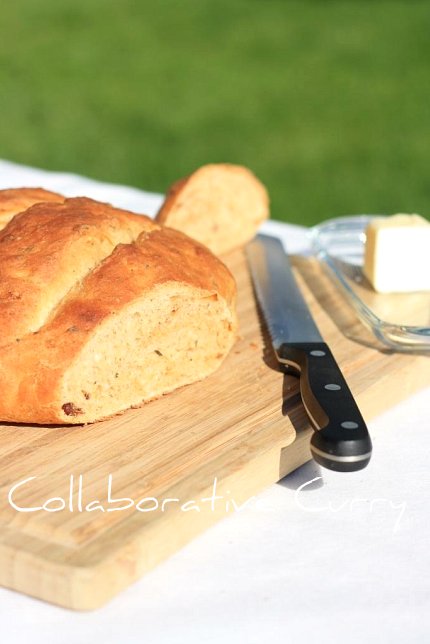
Stories apart, today I want to share the recipe for a focaccia. A simple and easy method,which I have been following successfully at home. Are you intimidated about yeast/yeast breads? If yes, then this is a perfect recipe to start with. You could never go wrong with a Focaccia recipe,like this. I have tried it several times and it always turned out perfect.

Herbed Focaccia


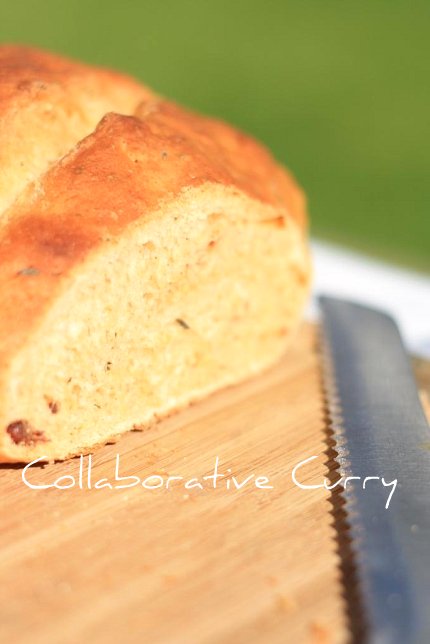
The texture is great and the taste is wonderful !

Herbed Focaccia

Ingredients:

Lukewarm water- 1 3/4 cups,divided
Sugar- 1 tsp
Active dry yeast- 2 tsp
Bread flour- 3 cups
A P flour- 3/4 cup
Salt- 2 tsp
extra virgin olive oil- 1 Tbsp

For Olive Oil topping:

Warm Olive oil- 3 Tbsp
Optional herbs/spices:(You can combine your favorites)
Freshly ground black pepper - 1/2 tsp
Dried oregano- 2 tsp
Dried basil- 1 tsp
Dried sage
Fresh Rosemary- 2 Tbsp (1 tsp if dried)
Garlic powder- 1 tsp

Method:


1.Take 1/4 cup of lukewarm water and mix yeast and sugar and set aside for a couple of minutes or until its frothy.
2.In the bowl of your electric mixer - mix the flour, and salt together.
3.Add to it a tablespoon of oil and mix again.
4.Start pouring in the rest of the lukewarm water into the dough and start mixing.
5. Follow it with frothy yeast and continue mixing the dough.
6.Slowly add the rest of the water and mix until the dough comes together and leave the sides of the bowl.
7.Continue kneading for 5-6 minutes or until the kneading is done. (you can test this by pushing down the dough with your finer and if it is done, the dough will bounce back).
8.The dough shouldn't be too tight. It is better if it's on the stickier side.
9.Take out the dough from the bowl and make a smooth ball out of it.Spoon over some olive oil to coat the dough ball and the bottom of the bowl.Cover this and keep in a warm place to rise to double. This may take about 1 1/2 to 2 hours.
19.Take out the dough from the bowl and knead on a lightly floured work surface.
20.Prepare a baking pan by greasing and place the dough in it and flatten the dough till it is about an inch thick.
21.Cover it and let it rest for 30-40 minutes.
22.Preheat the oven at 400 degree F.
23.Make the herb oil by warming the oil in a microwave safe bowl/to be on a safer side, keep in a thick bottom pan that is small and warming the oil. If you are using a microwave, be very careful, do not burn yourself or the oil :-) Keep the oil for 15 seconds and check and keep another 15 seconds until it is warm enough.
24.Mix the herbs in the warm oil and mix well.
25.When the dough is ready, risen double, dimple it with your finger tips and brush with this herb oil.
26.Bake on the center rack of the oven for 18-20 minutes or until it is slightly browned on top.
27.Cool on a wire rack before you slice it.

Sending this bread to Yeastspotting.

Notes:

1.You could use any pizza recipe to make this bread.
2.The herb toppings is up to your imagination. You could use any combo of your choice.
3.You could add more olive oil on the top if you wish.

Adapted from : Flavored breads by Mark Miller and Andrew Maclauchlan
and Bread Baker's Apprentice by Peter Reinhart
Contributor: Namitha

Wednesday, March 9, 2011

Paczki (Pounchki/Punchki)

The Lenten Season starts today on Ash Wednesday. Yesterday was Fat Tuesday-the day when all rich and fatty foods in the house is to be finished. This concept falls under the European culture. I am drawing a blank as to what Christians in India traditionally would make on Fat Tuesday. Back home my family did not make a big deal of it but we all stuffed ourselves with meat and fish before lent starts.  Yes, for lent we give up only meat and fish, not sweets nor rich food.

Punchki

As such, I decided to go with the European tradition on Fat Tuesday this year.  With a little snooping around on the web found a recipe for paczki. Simply put, packzki is a polish doughnut.  Deep fried with stuffing and dusted with sugar- it's decadent. It is also very filling, but then again that’s the whole point of having this on Shrove Tuesday/Fat Tuesday. The recipe is from here. All I have done is halve the quantity and skip the step of layering and filling before frying.

Punchki

Punchki

Ingredients:
Eggs – 3 Whole or 6 egg yolks
Salt – ½ tspn
Dry Yeast – 1/8 ounce (half of a sachet is what I used)
Water – 2 Tbspn
Butter – 1/3 C at room temperature
Sugar – ¼ C
Bread Flour – 2 ¼ C
Brandy or Rum – 8 tspn (I eye-balled about half of 1/3 C)
Whipping Cream – ½ C scalded
Preserve – to fill (I used Smuckers, apricot preserve)
Oil – for deep frying

Method:
1. Beat eggs for about 5 minutes or until frothy. If you are using only egg yolks(which is recommended) beat till it is thick and soft, and set aside
2. Dissolve yeast in luke warm water 110 D C
3. In a separate bowl Cream butter and add sugar gradually and beat until fluffy
4. Using the lowest speed on your egg beater beat in the yeast
5. Add about 1/8th cup of flour into the above mixture
6. Follow up with your choice of rum or brandy and half the cream
7. Beat in ¼ cup of flour
8. Beat in the remaining cream
9. Add ½ of the remaining flour and the egg and beat for 2 minutes
10. By now I changed the blade on my hand mixer to the hook which is used to knead dough
11. Gradually beat in the remaining flour until it comes together as a ball
12. Cover and let it rise.  It will take about an hour.
13. When doubled, takes about an hour punch it down, cover and let it rise again
14. After another hour or so, punch down again, and on a floured surface (you will need some flour since the dough is sloppy) use a rolling pin to roll the dough out to about 2 inch thickness
15. Cut using a cookie cutter or glass
16. Deep fry on low medium until both sides are golden brown.
17. Break a punchki and make sure the insides are cooked.  This will help to gauge if you have the heat on the right setting. 
18. Serve with cream or fruit preserve filling.

Submitted to Yeast Spotting

Contributor: Sunitha

Friday, February 18, 2011

Peter Reinhart's Buttermilk White Bread

White bread always reminds me of freshly-baked breads in bakeries, back in my hometown, Kottayam. I think most families have their own favorite bakeries, where they pick up their goodies. Like white breads, rusk and cup cakes were some of our favorites which we always brought. Talking about which, I remember vendors carrying baked buns and dilkhush in bamboo baskets, and selling them door-to-door. My granny would buy us children whatever we point at! You know, the things most parents would stir away from. Grandparents are like that! They are here to pamper grand kids and spoil them! Right? I wouldn’t have it any other way.


Buttermilk White Bread


I have tried several bread recipes, some of them are posted on this site. But I have never tried baking white bread, so far. We (my family and I) do not like the usual store-brought white bread. Then again, when you bake them, it is a different story. This is why I started searching for a white bread recipe, and yet not the usual, but something different, something special! Bingo! I found it in the recipe I am sharing with you today. The butter, buttermilk and egg that goes into this recipe gives the bread a die-for-it flavor nobody can resist. I saw this recipe was recommended by many other sites when I decided to give it a go myself. I would not talk about the recipe to you unless everyone in my family loved it. Great recipe!

I made buns using half the dough and they came out great as well !


Buttermilk White Bread

Serve it with your favorite spread or with soup


Buttermilk White Bread


Ingredients:

Bread flour- 4 cups +1/4 cup if necessary
Salt- 1 1/2 tsp
Sugar- 3 Tbsp
Active dry yeast- 2 tsp (approx 1 packet)
Butter- 1/4 cup at room temperature
Buttermilk- 1 1/2 cup
Egg,slightly beaten,optional,for brushing on top- 1

Method:

1.Stir together the 4 cups of flour,salt,sugar and yeast using a spatula or your mixer.(yes,you don't have to dissolve the yeast in anything)
2.Add the softened butter,buttermilk and lightly beaten egg and mix well, till the dough comes together.
3.Knead well for 6-7 minutes using your kitchenaid.
4.If you are using hands, then transfer the dough onto a floured surface and knead well for at least 10 minutes.(the dough is a little bit on harder side )
5.Spray or coat with oil and cover the dough. Keep in a warm place to rise for about 2 hours or until the dough has doubled in size.
6.Transfer the dough onto a floured surface and divide the dough into 2 equal parts, if you are making bread and cover with a towel and let rest for 20 minutes.(I divided one part into 6 and made some buns too)
7.Divide the dough into 12 equal parts if you are making buns .
8.Shape them and cover with a towel and let rise for about 90 minutes or until doubled.
9.Meanwhile preheat the oven at 350 degree F, if you are making bread,400 for rolls and 450 for buns.
10.Give an egg wash, using an egg beaten lightly with some water or use some milk, just like me, to brush on the top.
11.You could use sesame or poppy seeds to sprinkle on the top.
12.Bake the bread loaves for about 35-40 minutes or until the top turns golden brown.Bake the buns for about 15 minutes
13.Cool on a wire rack.Serve with the spread of your choice


Sending this for Yeastspotting at Wild Yeast
and Foodpaltette series Brown at Torview


Buttermilk White Bread


Contributor: Namitha
Recipe Courtesy:Mainly from here.But basically it's from The Bread Baker's Apprentice, by Peter Reinhart.

Thursday, October 28, 2010

Sweet Pretzels

  The first time I had pretzels, it was the hard-baked miniatures.  They are the most tasteless, almost chalk-like things I have ever tasted!  It felt like someone cooked it with the sole purpose of keeping one's mouth busy, and not for taste at all.  Obviously, I never liked it and still don’t.   However, the minute I bit into a spongy, sweet, plump pretzel sold on a cart in the middle of a shopping mall in Antioch, Tennessee, I was hooked. Instant love!  

 
Sweet Pretzels


This morning when I decided to skip breakfast, I had no clue the thought of saying no to food could trigger a furious desire to eat.  In short, I succumbed to my carnal self and baked some spongy pretzels just like the one on the cart I had on a rainy, summer afternoon.  Maybe it was not raining, but I am just saying.  The whole pretzel experience was so good that my mind has automatically started associating it with my other favorite feature, the rain.   Breakfast ended up being quite good this morning.  The aroma of baking bread filled the room so much it was almost tangible.  It’s pure pleasure to delve into spongy, moist pretzels, and wash it down with a hot cuppa!  Now I have enough zing to get out and burn some of it off on the treadmill. 

Collaborative Curry


  The recipe for the pretzels is from the Swedish Cakes and Cookies book, but I have changed some of their tedious measurements.  When I tried to convert the dl to cups, I found they were a little off.  Hence, I have made my own corrections, and the pretzels came out well.

Sweet Pretzels


While I sweat it out on the treadmill I hope you have a pleasant experience with baking in your kitchen. Ciao!

Sweet Pretzels

Ingredients:

Butter - 7 Tbspn
Milk   - 300 ml (1 cup is 250 ml)
Sugar - 1/2 cup
Salt    - 1/4 tspn
Active Dry Yeast - 1 Satchel ( 2 1/4 tspn)
All purpose Flour - 3 1/2 cups
Egg - 1 Beaten for brushing

Method:
1. Melt butter on low heat in a sauce pan and add milk when melted and turn off the heat when the mixture is luke warm (115 D F)
2. Add the sugar and yeast and whisk until the yeast is dissolved
3. Add half of the flour and stir with a spatula to combine
4. Add the remaining flour and knead
5. Slide it onto a lightly floured surface, divide the dough into 16 parts
6. Roll each part in the palm of your hand as long as you can and shape into pretzels
7. Make sure there is enough space in between the twist and let is rise for 30 -45 minutes
8. Brush egg and bake in a preheated oven for 5 - 8 minutes or until golden brown on top

Oven Temperature: 475 D F
Convection: 425 D F

Contributor: Sunitha

Thursday, October 14, 2010

Cinnamon Rolls-Frosting

   We had posted the recipe (click here) for cinnamon roll sometimes back, however, the recipe for  frosting was not given.  Therefore please use the one I am sharing today because it's absolutely sweet :) and that's just the way I like my rolls.  You could also use cream cheese frosting which goes well with cinnamon rolls.  We will have a recipe for the same updated soon. 

   Other than eating delicious cinnamon rolls, parenting continues to keep me occupied. That requires all hands on deck, you will agree!  Weather wise, aren't the colors of autumn fading away from the scenery?  Maybe it's time to bring in some daffodil or hyacinth bulb and start watching them grow and herald spring. Let's try and forget the cold days and jump right on to pleasant thoughts, what do you say?  Have a good one!

Cinnamon Rolls

Here is a glimpse of the cinnamon rolls right out of the oven

cinnamon rolls

We love having them for breakfast, or as a snack with evening tea.  It's simply great as a mid day snack with coffee too. Now, you watch out for that waistline, I cannot be blamed for not warning. :) 

Cinnamon Rolls

Ingredients:

Confectioner's sugar- 1 1/2 cup
Milk- ~1/4 cup
Butter- 2 Tbsp
Pure Vanilla extract- 1/2 tsp

Method:

1.Mix everything together well using a hand blender and spoon it onto the cinnamon rolls.(add more milk if the consistency is too thick and a little more sugar if it is too runny)The best way is to add a tablespoon of milk at a time and continue mixing.


Cinnamon Rolls

Contributor: Namitha

Friday, October 8, 2010

Italian Breadsticks/Grissini

We have been talking a lot about fall and 'IT' is here! We hope all of you living in America are enjoying the beautiful fall colors, and the cool weather. The leaves look so pretty, but the wind is blowing them off so quickly that I hate it. Soon the trees will be all bare, and the snow will cover them. I don't even want to think about that right now. For the time being, let's talk about warm, toasty Italian bread sticks.

The Italian bread sticks (aka Grissini) originated in Turin, Italy according to Wikipedia. They are usually served as an appetizer in restaurants. I don't mind them having any time , either as a snack, or with a cup of coffee.

I didn't have the patience to make them into perfect ropes, but they still look pretty !

Italian Breadsticks

They could be served as an appetizer with a soup of your choice or enjoy them with a cuppa/ as it is :-)

Italian Breadsticks

Here is a glimpse from my kitchen.Hope this gives you an idea about rolling, cutting and making the sticks !

Italian breadsticks

Ingredients:

All purpose Flour- 2 to 21/4 cups
Salt- 11/2 tsp
Olive oil- 2 Tbsp
Active Dry yeast- 2 1/4 tsp/one packet
Sugar- 1 Tbsp(divided)
Mixed dried Herbs(I used a mixture of oregano, marjarom, basil and parsley)- 2 tsp
Milk- 1/2 cup + 1 Tbsp for brushing
Warm water- 1/4 cup

Method:

1.Mix half of the sugar and yeast in the warm water and let it sit for a couple of minutes.
2.In a large mixing bowl, combine flour(start with 2 cups),salt,rest of the sugar,dried herbs and olive oil.
3.Make a well in the middle and add the milk and the yeast mixture.Mix everything well.
4.Knead the dough for a few minutes using your stand mixer or hands.Add more flour,if necessary to make a smooth dough.
5.After kneading for another 4-5 minutes, shape the dough into a ball,cover and keep it for an hour in a warm place so that it will double in size.
6.After the dough becomes double,divide the dough into 4 equal parts.
7.Preheat the oven at 425 degree F.  Prepare a baking sheet lined with parchment paper that is slightly greased.
8.Roll out each part of the dough into a 12 inch long and 4-5 inch wide rectangle.
9.Divide this rectangle into 4 equal parts and roll up it lengthwise to make a stick.
10.Keep it on the greased parchment paper and let sit covered for 10-15 minutes. Brush with milk or with slightly beaten egg.
11.Bake for about 15 minutes or until it starts turning golden brown.
12.Cool on a wire rack and enjoy with a cuppa.


Italian Breadsticks

Notes:

1.Instead of adding the dried herbs in the dough, you could use them to make a topping for this bread sticks.After brushing with milk just sprinkle them on top.
2.You could also use sesame seeds to sprinkle on top.
3.The egg wash gives a nicer and better color for the bread sticks, but I prefer to use milk/oil.
4.This makes 16 bread sticks.

Inspired by: Home made breads by Better Homes and Gardens, 1960 edition
Contributor: Namitha

Monday, September 20, 2010

Croissants

Hope you had a sun-shining, pleasant-weather weekend in your neck of the woods. Here, the scrumptious weather continues with bright light, and a cool breeze keeping the edge off the heat. There were also plenty of croissants filled with pineapple and chocolate to enjoy. Did you say you had a better weekend????

Croissants

This is kind of my first attempt at taking step by step pictures. I cannot say I enjoyed this much, but hopefully it is helpful to understand the cutting and rolling of croissants.  There is spoon filling at the broad end of the triangle; roll-tucking in the center, while simultaneously keeping the tapered-end stretched.  This helps, give several layers as possible for the finished croissants.

Croissants

To make chocolate filled pastry, cut the dough in rectangles and roll
Croissants

Let it sit for about 10 minutes so that the dough rises a little, give an egg wash and sprinkle with sesame seeds if you like.  Do not leave pineapple pieces on the baking sheet while baking (like you see in the picture) because this might burn while in the oven.  I sprinkled some while photographing for effect, though, I doubt that was very successful.
Croissants

Aha! baked goodies, crisp on the outside with buttery layers inside.

Croissants

Enjoy for breakfast with milk, or every time you spot them on your counter top, grab one and pop'em in your mouth like I do.  No wonder the needle on my weighing scale keeps tipping to the wrong side.

Ingredients:

For the Dough:

All purpose flour bleached and enriched - 2 1/4 to begin.  )Keep plenty in store because you will need to work the dough while rolling)
Water - 3/4 cup
Eggs - 1 (beat and divide in two )
Yeast -  1 1/4 tspn
Salt - 1/2 tspn
Sugar - 2 1/2 Tspn
Butter - 1 1/2 stick (divide into six parts)

Filling:
1. I use cheese, jalapeno, chocolate and even pineapples.  You can use filling of your choice.
I have used chocolate chips, if you have small stick that will work better while rolling
For the pineapple filling I have used canned pineapple chopped fine and sprinkled with sugar

Method:
1. Mix yeast, 1/2 tspn sugar in 1/4 cup of luke warm water (110D F) and wait till the yeast froths
2. Take all the dry ingredients together in a bowl and make a well in the center
3. Add 1/2 the egg,( and retain the remaining for egg wash), water and yeast and using a spatula mix
4. Leave the dough in the refrigerator for 15 mintues
5. Dust your counter top with dough and drop the sticky dough in.
6. Knead the dough to make it supple and roll out into a rectangle
7. Spread one part of the butter and fold like a book. (Check this video for more help)
8. Wrap in cling film and refrigerate for 15 minutes
9. Continue rolling out the dough in rectangle, spreading butter and folding like a book until you exhaust the butter.  This makes sure you have incorporated the butter evenly and have flaky layers
10. You may refrigerate the dough overnight and bake them the next day or after resting 15 minutes
11.  Roll, cut, shape croissants and give an egg wash as mentioned earlier and bake at 400 D F for 10 - 15 minutes

Contributor: Sunitha

Wednesday, September 15, 2010

Calzone

Calzone is a baked turnover served with marinara sauce at its side. It is of Italian origin, but you may improvise by changing its filling. Today, I have kept the filling as true to Italian as possible. However, I will definitely try an Indian puff filling later. In short, there is no end to the variations you can concoct.

We enjoyed this as an evening snack yesterday, but it was quite filling. So much so that we didn't eat any dinner. Therefore, enjoy it as a one pot meal or snack but either ways you will not be disappointed. It's delicious.

On a different note:

Today is festive because of a pretty little girl,
she was born on this day a few years back.
Her stories and spirit she lends this blog.
She is Nami's daughter, I wish her a very happy birthday!

M- God Bless!

Calzone

Pizza Base:

I have used the recipe from our blog given here. This will make 8 Calzones.
1. Leave the pizza dough to rise to double in size, approximately 2 hours and go on to make the filling

Calzone

Filling:
Chicken Breast - 1 big
Onion - 1 medium size
Tomato - 1
Garlic - 4 cloves
Peas - 1/2 cup
Capsicum - 1/4 to 1/2
Green Chilis - 3 nos (optional)
Seasoning - a generous dash
( Mrs. Dash Extra spicy seasoning)
Antipasto - 1/2 cup (this was a mixture of cured artichoke, black and green olives and bell pepper)
Olive Oil - 1 Tbspn
Cheese - 1/2 cup (mix of parmesan, Asiago and Romano)
Egg white - of 1 egg

Calzone

Method:
1. Clean and chop chicken into tiny pieces
2. Heat oil in a pan and add chopped onions and saute, followed by garlic
3. Once the onions have become translucent add the chicken pieces and saute till it turns white
4. Add chopped tomato, seasoning, peas and salt about 1/4 tspn and saute
5. Keep the vessel covered and cook for 10 minutes or until chicken has cooked through
6. Add the capsicum stir in and cook for a minute and add the antipasto and stir in and remove from heat

Preparing Calzone

1. Once the dough rises, which takes about 2 hours, punch it down and divide into 8 equal parts
2. Roll each part into discs as much as you can roll out. About 1/4-1/2 inch thickness
3. Spoon in the filling, sprinkle over 1 Tbspn of cheese on one half of the disc.
4. Lightly apply water to the edge of the disc
5. Lift the other half over to cover the filling and edges of the disc meet. With a fork seal the calzone
6. Beat an egg white and using a pasty brush do an egg wash over the calzone
7. Bake in a pre heated over for 360 D F for 10 minutes or until the calzone is golden brown on top


Serve with marinara sauce as dinner or enjoy like you would a savory snack.

Contributor: Sunitha

Friday, September 10, 2010

Cinnamon Rolls

  Whirl wind romance with cinnamon rolls.  Pretty, sweet swirls with cinnamony goodness a delight in your mouth and to the eyes.  The aroma wafting while it bakes puts all candles from the store to shame.  

Cinnamon Rolls

 I have to confess though that kneading the gooey dough for a good 30 minutes was no joke.  To begin with  I measured the quantity of dough all wrong.  I use a light flour 'White Lily.'  If you are not using bread flour and this one they remember to read the fine print.  It says, add 1 cup and 2 tbspn to equal 1 cup of all purpose flour.  Bah! not being careful with the measurement made me waste a lot of time.  It took my brains 30 of kneading the gooey dough before realizing the folly.  The very wet dough I was working with proved too much for my shoulders.   However, once I got the proportions all fixed it worked like a charm.

Cinnamon Rolls

  Like in all relationships misunderstanding once worked out everything falls in place.  The cinnamon rolls out of the oven was perfect.  I was tearing at it in delight as soon as it was cool.  They are great as an evening snack with tea or breakfast with a strong cup of Nescafe.

Cinnamon Rolls

Ingredients:
1. Bread Flour (or all purpose flour which is bleached and enriched) - 2 1/2 - 3 cups
2. Sugar      - 1/4 cup
3. Salt         - 1/4 tspn
4. Vanilla Essence - 1 tspn
5. Eggs - 1

6. Milk   - 1/2 cup
7. Butter 1/4 cup
8. Yeast - 2 tspn dry active
9. Water - 2 Tbspn (warm at 110 DF)
10. Sugar - 1 pinch

Method:

1.  Take ingredients 8, 9 and 10  and mix and set aside till yeast froths
2. Mix ingredients 1 to 3 in a bowl large enough to knead the dough. (Use only 2 1/4 cup to begin with and as needed add the remaining flour)
3. Mix all the wet ingredients 4 to 7
4. Make a well in the flour and pour the wet ingredients
5. Add the frothy yeast
6. Start stirring in with a spatula slowly incorporating the wet and dry ingredients
7.The dough will be sticky but will come together to make a smooth dough with kneading
8. After 10 minutes of kneading in the bowl lightly flour a surface and working a little flour in if gooey knead the dough until you have a smooth dough
9. Place in the bowl cover with damp cloth or cling sheet and set aside for the dough to double in size

Cinnamon Filling
Brown Sugar - 1/4 cup packed
Cinnamon Powder - 1 1/2 tspn
Butter                    - 3 Tbspn melted

Rolling:
1. Once the dough has doubled (it takes about 1 1/2 to 2 hours) punch down the dough and roll it out into a rectangle shape.
2. Brush the melted butter on and add the mixed sugar and cinnamon powder evenly
3. Roll and pinch the top
4. Using serated knife cut 1 inch pieces and place in a 9 inch or any tin dish
5. Keep it covered to rise and the rolls should stick to each other
6. Bake at 350 D F for 15 -20 minutes or until golden brown

Entering this for Champa's Bake off Event. To find more click here.

Contributor: Sunitha

Wednesday, February 17, 2010

Sun-dried Tomato Bread

  Bread making is therapeutic.  If you love the feel of dough and the gentle but firm kneads that work rhythmically it is quite satisfying endeavor.  The best part for me is the aroma that fills the house while baking the bread.  Divine.  Sometime back Sunitha made this bread, but she never took any pictures.  We decided whoever makes it next will take the pictures and share it with you and here you are. This bread is tasty to eat as it is.  Nevertheless, please do try different ways to enjoy this with a dip, soup or sandwich with your favorite meat or vegetables.  Either ways it is sure to tingle your taste buds and make you craving for more.

  Can I tell you how my 2 year old is?  Mine has got his motor skills improved and he is running riot in the house.  Banging vessels, imitating his sister in everything he says, energetic and active pursuing new all the time.  He is a handful.  I don't know how but he randomly gets the keys on the the keyboard and the control panel on the screen never in one place.  The worst was when he silently crept close to the socket and tried to dig in two plastic bands used for securing packets and wires etc.  Of course the sockets are all child protected but his curiosity is something else.  If someone asks me to run the marathon now I will win because I literally fly around the house saving a pan that is flying all over the house or rescuing him from that scientific discovery he is intent on making.
  He escapes all the time with his charming smile that says I know you don't like me doing this but mom I am just discovering the world.  Hope you have some fun today and enjoying yourself even if is just running around the house in your pyjamas with your 2 year old. 


Ingredients :

Bread flour- 4 cups
Yeast- 1 1/2 tsp
Water- 1 1/2 cups
Milk, lukewarm- 2 Tbsp
Basil/Thyme/Rosemary (dried)- 1 Tbsp
Sugar- 1 Tbsp
Salt- 1 tsp
Olive Oil(you could use the same oil from the sun dried tomato bottle)- 1 Tbsp
Sun dried tomato- 1/3 cup


Method:

1.Dissolve the yeast in the lukewarm milk and let it sit for a couple of minutes.
2.Whisk together the flour, salt and sugar in a large mixing bowl.
3.Add the sun dried tomato, basil and mix again.
4.Pour the milk-yeast mixture and slowly add water and mix well.
5.Transfer the dough to a floured surface and knead using your hands. Knead well for 5 minutes.
6.Cover the dough and let it rise in a warm place for 40 minutes.
7..Take out the dough and knead to remove the air formed in.
8.Cover it and keep it back again in the warm place for another 40 minutes.
9.Press and knead the dough again, and divide it into 2. Cover and let it rest on the floured surface for 20 minutes.
10.Shape the dough into 2 rectangles that are about 6 by 8 inches in size.Make sure that the thickness is even in all places.
11.Let it sit covered for the third and last time in the warm place for another 40 minutes.
12.Preheat the oven at 425 degree F.
13.Make scores on the dough using a greased knife or razor blade and bake for 25 minutes or till the top turns a nice brown color and you hear a hollow sound when you knock on the top.
14.Cool on a wire rack.


Notes:

1.If you like the tomato flavor on the higher side you could add 1/2 cup sun dried tomato.
2.This is quite time consuming, like any other yeast bread recipe. So you may want to plan in advance.
3.My scores didn't come out perfect :( I need to practice more :-)

Recipe adapted from :Baking at home, CIA

Contributor: Namitha

Thursday, February 11, 2010

Home made Paav with Paavbhaji masala-The most popular streetfood in India

  Bad weather has its own share of positive; it’s the best time to bake. I have been flirting with the idea of making pav bhaji for a while, and after trying out Sunitha’s recipe for bun and their whooping success it was inevitable. I shaped them into paav and made a hearty portion of bhaji which was received with a roar of excitement by my girl. Well, my daughter needs her share of experiment with the famous street food of India, won’t you agree?
Paavbhaji
I have enjoyed street food and am still very fond of them, like you can see. Pav bhaji tops the list. The pani puri, masala pav etc are all equally good and they all bring back a flood of memories. Times with friends. Money was difficult to come by those days but there was always enough for a plate of pav bhaji. Hot off the stove, enjoyed on a cool evening after the nasty heat spell of the day. Wash it down with some sugarcane juice and voila it’s the perfect fix.

For Paavbuns

 Follow our recipe here.  If you do not have White Lily flour you can also make them with the following differences.  When you keep making breads you will discover how to make your own changes.  We wanted to tell you this so that you may dare to experiment and come out with successful results every time you make bread.  Please feel free to ask us in case of questions.   

Tips:
1.All purpose flour and bread flour in 1:1 ratio.
2. More water, and less milk, making the final water content the same.
3.When you reduce the fat content you can use less yeast, say for ~7 cups of flour ,I only used 2 packets of yeast. ( yes I made a bigger batch this time !)
Paav bun

For Paavbhaji masala :

Ingredients:

Onion- 1
Garlic crushed- 5-6cloves
Tomato- 1
oil-2 tbsp
Frozen green peas- 1/2 cup
Bellpepper(finely chopped)-2 tbsp
Potato- 1
Cabbage- 1 small piece
Cauliflower florets- 1/3 cup
Beans- 4-5
Carrot- 1 small
Paavbhaji masala- 2 tbsp
Red chilli powder- 2 tsp/acc to your spice level
Butter- 2-3 Tbsp
Criander leaves- for garnishing
Lemon wedges-for serving
Finely chopped onions-For serving

Method:

1.Coarsely chop all the veggies except green peas and bell pepper and cook them in a pressure cooker with a little water and salt.If you are planning to cook on steam then chop them finely.
2.Heat oil in a pan and saute the finely chopped onions.
3.When it starts turning golden brown,throw in the crushed garlic and saute till the raw smell leaves.
4.Now add the chopped tomatoes and saute till the oil starts leaving the sides of the pan.
5.throw in the green peas and chopped bellpepper into this and saute well.
6.Add the masala powder and chilli powder and stir till the raw smell leaves.
7.When the veggies are cooked mash them well and pour it into the masala mixture.
8.Stir well and add little more water if required.
9.Boil this and cook for 8-10 minutes on low heat.
10.Add the butter and stir well.
11.Serve warm with sprinkles coriander leaves on top.
12.It is bettr tokeep the pan on a low-heated stove while you serve it with hot paav buns.
13.heat a pan and apply butter, keep the paav buns, that is cut into halves with cut ends facing the pan. Take out and serve warm with the paavbhaji masala.
14.usually we also serve some chopped onions and lemon wedges sprinkled with chopped coriander leaves with the masala.

Paavbhaji


Contributor : Namitha