Showing posts with label Rice. Show all posts

Tuesday, April 24, 2012

Mango Rice with Cucumber Mint Raita

How are you all? Hope you had a great week end ! We had a fabulous week end with lots of good food,good company, fun and laughter.Food tastes great when you share it with somebody,don't you think?


Tuesday, May 31, 2011

Cilantro Lemon Rice

Hope our friends in U.S enjoyed the long weekend. I did. We visited friends and even hit the malls to check the Memorial Day sale. By the crowd in the malls, I could see most people were making good use of the discount sales. I did not find anything I wanted so came back empty handed but had fun nevertheless being out and about.

Lemon-Cilantro Rice

I made some cilantro rice on Friday and had it with chicken curry. I always enjoy the Chipotle burrito, especially the rice they pack in it. To have a change from the usual white rice, I decided to try my hand at cilantro rice and what do you know, it was pretty good! When you have guests over and have too many things to cook, this rice will make be easy enough to put together, and yet keep the festivity alive because this rice has the zing of lemon and a burst of cilantro flavor.


Lemon Cilantro Rice

I have seen recipes which calls for lemon zest and I say go ahead and do that if you like. I have not used it in the recipe below but I can see it will be fun to add some lemon zest to add more punch. You can play with the amount of lemon juice to make it suite your palette. Lemon and cilantro cannot go wrong in the coming summer months. Don't you agree?

270

The possibility of mixing this rice in your salads and wraps is endless. It's also great with chicken or any other curry.


Ingredients:
Basmati Rice – 2 C
Tejpatta/Indian Bay Leaf – 1
Salt – to taste
Lemon juice – 2 Tbspn
Soya sauce - 1 Tbspn (optional)
Cilantro - 1/2 C
Canola Oil - 1 Tbspn

Method:
1. Wash and soak rice for about ½ hour
2. Bring about 10 cups of water to a boil. Strain the water from the soaked rice and slip it into the boiling water along with bay leaves, and enough salt. Taste the water to make sure there is enough salt. Cook the rice al dente.
3.Chop the cilantro fine and mix it with lemon juice, soya sauce, and oil in a serving bowl which will hold all the cooked rice. Add a couple of spoons of rice and mix with the cilantro-lemon mix. Add the remaining rice on top and using a fork fluff the rice until well mixed with cilantro and lemon.

Notes:

1. If the cooked rice is not salted well enough, add more along with the lemon juice - preferably, dissolved in the lemon juice to have it evenly mix in the rice.
2. If you like the rice to be white in color avoid the soya sauce and replace it with lemon juice.

Monday, December 20, 2010

Spanish Rice

   I like Mexican food, fajitas being my favorite.  The restaurant Si Senor next door to us does a fine fajitas .I am still perfecting the recipe for the fajita but in the mean time I want to share the Spanish Rice recipe.  The internet is gravid with recipes for this rice and mine is no different.  If you have never tried this dish before please give it a go because this is very tasty and the way I see it, most Indian curries will be a great accompaniment with this rice.      

 Mexican Tomato Rice

The following recipe is mild feel free to tweak the spices to your liking.

Mexican Tomato Rice

Ingredients:
Rice - 2 cups (long grain)
Chicken Broth - 4 cups
Tomato Paste  - 2 Tbspn
Chili Powder   - 1 Tspn (you can avoid this if you don't want it spicy)
Garlic              - 4 pods
Onions            - 1 cup chopped (about 1 medium onion)
Cumin Powder - 1 Tspn
Anaheim Pepper - 1 (mild pepper) chopped (If you want to replace it with any other pepper of your choice its fine just make sure you know which one is hot and mild)
Oil - 2 Tbspn

Method:
1. Wash and drain long grain white rice
2. Saute onions and garlic, when garlic becomes aromatic add rice and fry for about 3 to 4 minutes or until th rice crackles
3. Add the tomato paste diluted in about 4 Tbspn of broth and the cumin powder. Mix in. .
4. Pour the remaining broth and bring to a boil.  Reduce flame and cook on very low flame until all the water is dry.
5. Fluff the rice with a fork and serve

Contributor: Sunitha

Thursday, September 2, 2010

Chinese Fried Rice

How are you doing on the 2nd of September? Happy New Month! Nobody wishes on a new month, what!? I will.. Happy New Month to you and me.

I cooked some Chinese fried rice today not to celebrate the new month but just out of whimsy. It's quite convenient you see for a Malayalee to make fried rice. After all, the china wok is what we use daily for our thoran and mezhukkupuratti 'cheena chatt.' Yep! Kerala and China go a long way back. Otherwise I don't know why everyone I know back home uses this chatti.

Now that we have established the convenience of making fried rice for me let me also say I quite like this dish. When we make it at home we can bring the amount of oil to a bare minimum making it quite healthy too. I will not keep you with anymore rambling. Let's get to the point, alright!

Chinese Fried Rice

That little golden glory you spot in the picture is outside my window. Yellow leaves mottle the oak tree and the iredescence of the sunlight on it. Quite distracted with the sun and the rustle of leaves outside

Ingredients:

Rice - 2 cups

All vegetables diced to small pieces (I say, smaller the prettier)
Ginger - 1 tspn
Garlic - 1 Tbspn
Green Chilies - 4 nos
Onion - 1 small diced into small cubes
Carrot - 1
Beans - 20 nos
Cabbage- 1 cup chopped
Celery - 1 stick
Oil - 1 Tbspn
Soya Sauce - 4 Tbspn (watery kind, use more if you like)
White pepper powder - 1/2 tspn

Chinese Fried Rice

Method:

Cook rice, please follow instructions here

1. Heat wok and add a tablespoon of oil
2. Add vegetables starting with onions, ginger, garlic and green chilies. Fry on high heat
Followed with carrots, beans, cabbage quickly stirring with each addition. If you cannot keep up with quick stirring crank the flame down so as not to burn the vegetables
3. Add salt once vegetables are done.
4. Sprinkle the pepper and stir in

5. I set the cooked vegetables aside and then add 1 day old cooked rice. Add soya bean sauce and when the rice is heating. Stir in the cooked vegetables.
6. Finally, top with scrambled eggs

Chinese Fried Rice

We would like to send in some entries for Jay's Letz Relish- Paneer event


Kadhai Paneer
Malai Kofta

Entering the rice for Festive Rice Event 


Contributor: Sunitha

Monday, April 5, 2010

Fenugreek/Methi Rice

Festivals are when I miss being at home and eating what my mom cooks the most.  The last couple of days made me realize how much I keep moving away from the tradition.  Easter would have been a day starting with appam and stew followed with a heavier lunch of cutlets and a variety of curries made of the best fish and meat.  Now, I make do with a simple rice and a chicken or meat curry and say, enough!

You must have guessed I am not in the greatest spirits but its only monday morning blues.  What I hate about holidays is the first day after it.  It's difficult to get past this one without feeling glum.  Without further spoiling your spirits let me share my recipe for fenugreek rice.  The fenugreek leaf is slightly bitter and in abundance may not be to your taste but with the right mix of things this aromatic leaf produces a dish quite scrumptious.

You will need:
1. Rice - 1 Cup
2. Fenugreek leaf - 1/2 cup
3. Coconut - 1/2 cup
Cardamom- 2
Cinnamon stick - 1 inch
Cloves - 2-3 nos
Onions - 1/2 
Peas - 1/2 cup
Beans - 4-5 (optional)
Green Chilis - 2 or according to taste
Oil - 1-2 Tbspn
Lemon juice - of 1/2 a lime

Method:
1. Heat oil in pressure cooker or whichever vessel you use to cook rice. 
2. Add the whole garam masala (cardamom, cinnamon and cloves)
3. Add thinly sliced onions and saute to golden brown
4. Mid way to sauteing the onions add your ginger, garlic and green chilies in this order 
5. Add fenugreek leaves and saute
6. Add coconut ground to a paste
6. Add beans and peas and saute followed with washed and drained rice
7. Mix well and add salt to taste 
8. Add 1 1/2 cups of water and check if salt is enough squeeze 1/2 a lime in now and pressure cook for approximately 4 minutes on medium flame
9. You may garnish with deep fried onions, cashew nuts and raisins
10. Serve with any curry of your choice or just a yogurt salad
 
Contributor: Sunitha

Wednesday, February 24, 2010

Neychoru with raita/Ghee Rice with Salad

Neychoru is a North Kerala specialty. To be precise it’s a North Kerala Muslim specialty. I tasted it for the first time at my friend's place and instantly fell in love. It is a rich preparation with clarified butter, cashew nuts, raisins and golden fried onions. The aroma wafting through the house while this is being prepared is enough of an appetizer. All of these qualities make it an ideal treat for our cold, cold weather. Disclaimer: This is not for the weak hearted. Literally. It is so calorie rich that if I call it "healthy" neichoru, it will be one of the best oxymoron you've ever heard.


Ingredients:

Basmati Rice- 2 Cups
Hot Water- 3 1/2 cups
Ghee- 4-5 Tbsp
Cashews- 2 Tbsp
Raisins- 2 Tbsp
Onion- 1 Big
Cinnamon stick- 2 one inch sticks
Cloves- 4-5
Cardamom seeds-From 2
Salt- To taste
Oil- For frying

Method:

1.Wash the rice and soak it in water for at least 30 minutes.Drain and keep aside.
2.Heat 1 Tbsp of ghee in a pan and fry the cashews and raisins till they turn golden brown in color.
3.Heat the pan in which you are planing to cook the rice .Pour 3-4 Tbsp ghee into it (you could reduce the amount , but the more the merrier !).Add the spices and saute for a minute and throw in the drained rice into it. Saute this for 3-4 minutes.Add salt and mix well.
4.Meanwhile you could heat/ boil the water.
5.Add the hot water into this and allow to boil on high heat. When the water starts bubbling well reduce the heat and continue cooking for another 8 minutes or till the rice is done.
6.Heat the oil for frying and fry the onion.
7.Serve the rice after garnishing with fried onion,cashews and raisins.
8.Best served with raita or chicken/mutton curry.


For Raita:

Ingredients:

Yogurt- 1/2 cup
Tomato(chopped)- 1 small
Onion(Chopped finely)-1/3 cup
Green chillies (chopped)- 2-3
Salt

Mix everything well and serve chilled.

Notes:

1.It's important to use best quality basmati rice and best quality ghee for this preparation. As you know the aroma of rice makes a huge difference to your neichoru, or biryani.
2.Also I've used home made ghee for making this and it is the best :-)

Friday, February 19, 2010

Kanjiyum payarum/Rice gruel with green gram

For people like me, 'kanjiyum payarum' (rice gruel and green gram) is synonymous with comfort food. I think its pejorative when kanji is symbolized with poverty or ill health. But it is true.  Some consider it the poor man’s food. Let me begin in defense for this hearty meal stating the cultural relevance the food has in Kerala. On Good Friday, Jacobites (a Christian denomination) after spending a day in prayer and fasting eat Kaji at church in fellowship.  The muslims, during the season of Ramdhan often break their fast with kanji and thereafter following up with their Iftar party which serves party food. I need to add, after fasting for an entire day nothing feels as good as 'Kanji and payar' as my friends say.  Hope this helps to see Kanji as an integral part of our culture. Apart from this without any religious connotation this is equally enjoyed as a dinner and some times even for breakfast by many families.  Even though kanji started being used on somber occasions or talked as food for the poor it was clearly a energy booster. It shakes off melancholy.  I know it must be the sugar kicking in but I hope I have made my case.


Now,  let’s do a comparison with soup. If you take a close look, this dish is a healthy vegetarian soup except that starch and protein are prepared and served separately and each has to make his/ her individual soup on the table. The rice gruel is served with cooked green grams spiced with black and red pepper, mustard, shallots and curry leaves. To substitute the bread, crepes, croutons etc that goes with soup we serve pappadam with the gruel. Pappadam is a thin disc or call it wafer made with black gram or urad dal. These are mostly shop bought and fried at home. You can see how spices,  plentiful in our part of the world, are incorporated to make a hearty soup. Now you know why I call it ‘comfort food.’

Ingredients :

For kanji(serves 2)

Parboiled rice- 1/2 cup
Water- 2-3 cups(there should be enough water left after cooking !)

Method:

1. Wash the rice and pour water.
2.Cook in a pressure cooker for upto 2-3 whistles or until rice is done.

For green gram/cherupayar thoran

Moong beans(green gram)- 1/2 cup
Salt- To taste
water- 3/4 cup
turmeric powder- a small pinch
Grated coconut- 2 Tbsp
Red chilli powder- 1/2 tsp
Red chillies- 2
Mustard seeds- 1/2 tsp
Curry leaves- 1 sprig
Oil- 1 Tbsp


Method:
1.Wash and clean the green gram. Cook in a pressure cooker after pouring the water and adding salt and turmeric.
2.Cook on high heat till the first whistle and then simmer and cook for 2 more whistles or at least 15 minutes.( This time period is for my medium sized cooker. This may vary for your cooker !)
3.heat oil in a pan and do the normal seasoning by spluttering the mustard and sauteing the red chillies and curry leaves.
4.To this add the red chilli powder and stir cook for couple of minutes on low heat.
5.throw in the coconut and the cooked green gram , mix well.

Serving Suggestions.

Sprinkle some salt on the kanji and mix well. Serve with green gram thoran, pappad and a pickle of your choice.Sure you will go for a second serving :-). You could serve simple gravies like pulissery with this.
While talking about pulissery I must say that the kanjivellam (water in which rice is cooked) when mixed with some pulissery and a pinch of salt makes a healthy summer drink.

Wednesday, January 13, 2010

Lemon Rice

Lemon rice always reminds me of one of my college friends. While most of my classmates lived with me in the hostel this one was lucky to stay with grandparents. She would always bring delicious home made food and her tiffin (lunch box) was wiped clean by the food depraved hostelites. We had a win-win situation in this case because while we loathed eating cafeteria food everyday she was fed up of home made food. Nonetheless, she also had to finish her tiffin or granny wouldn’t be a happy camper. She generously let us gobble down the lemon rice while she enjoyed the coke and puffs form the cafeteria. Win-win situation, you will agree?

Lemon Rice

Lemon rice is also synonymous with long train journeys. They keep so well that we would take them on our long train journeys. The lemon and oil in the preparation acts like preservatives and stays good even in the hot and humid weather.

Food and music always makes me nostalgic and takes me back to a different time. I am sure you have your own stories and memories surrounding some food. I hope while you enjoy my recipe today beautiful memories conjure up flooding you with happiness.


Ingredients:

Cooked Rice-3 Cups
Cooking Oil- 3 tbsp
Mustard seeds- 1/2 Tsp
Channa Daal- 2Tbsp
Peanuts(raw)- 4 Tbsp
Urad daal-1 Tsp
Curry leaves- 1 Sprig
Red chillies- 4-5
Asafoetida- a pinch(optional)
Lemon juice- 1/3 cup(depending on the sourness of lemon)


rice

Method:

1.Heat oil in a wide pan
2.Fry the peanuts till it is done, take out and keep aside.Fry the channa daal and keep that aside as well.
3.Splutter the mustard seeds and urad daal and throw in the red chillies, saute for a minute.
4.Add salt(if you have added salt while cooking the rice, be careful), turmeic and asafoetida and mix well (should be done on low heat, or else you will be burning the powders)
5.Add the rice (cooked) and mix well.
6.Switch off the heat. Add lemon juice and mix well. Check the taste and add more lemon juice if required.(It should be on the higher side,if you are eating later, since the rice will absorb it if you keep it longer.)
7.Mix in the fried peanuts and channa daal
8.Serve warm or cold with a pickle of your choice, yogurt or as it is.Enjoy !

Notes:

1.The rice must cool down well, if you do not have the prepared rice from previous day.The rice grains should be separated and lumps should be avoided.
2.If you are preparing rice for this dish, you could add salt while cooking the rice.
3.If you are planning to pack this for later, let it cool down completely before doing so.

Lemon rice

Contributor : Namitha

Monday, December 28, 2009

Hyderabad Chicken Dum Biryani

We hope you all had a wonderful Christmas with family and friends. Just over with Christmas and a new year around the corner, I decided to share my Christmas special Hyderabadi biriyani :) By the way, I had a good Christmas with family. Lots of sofa time watching movies, indoor games etc and we also ventured out to play in the snow. Eating cookies and cakes like there is no tomorrow was also a big part of the season. It was fun!
If you have been following our blog you know most of my Hyderabadi stories and how fond I am of them. However, you should be patient with me because my culinary skills took shape while there. Also, if you have had Andhra food you will agree there is so much to be inspired by their cuisine. It leaves an indelible mark in your way of cooking, eating and your stories too :D At least it has for me.

Hyderabad Chicken Dum Biryani

I lived in Hyderabad for 5 years and never tried to make this world famous biryani while there. Why? Well, when you get delicious biryani from "Paradise" and "Hyderabadi House," the restaurants renowned for their biryani in Hyderabad, who wants to make it at home. I still remember how when we drove past the Paradise circle in Secunderabad my hubby and daughter would suddenly have hungry pangs. It didn’t matter if it was day or night we would have to stop and indulge ourselves. I would secretly share their feelings though I kept a ‘not interested face.’ Giving into our cravings we would walk into the restaurant like magnet attracts iron. The aromatic goodness of the rice and meat cooked to perfection readily comes to my mind.
Talking about Hyderabad Biryani, the most famous is the mutton biryani. The biryani comes from the royal kitchen of the Nizams the rulers of the historic Hyderabad state for, until the Indian Independence in 1947, almost 2 centuries. Nizams' kitchen used to serve more than 50 different types of biryanis. This is a mixture of Mughal and Telugu cuisine and there are 2 ways of preparing this biryani ; katchi biryani and pakki biryani. Katchi biryani is cooked in the dum method, as the name suggests, raw meat is cooked over the steam along with rice. All the flavors of meat and exotic spices infuse into the rice giving the biryani the perfect flavor. In pakki biryani, the meat is cooked with spices and fried onions and then layered with rice. Today, I am going to tell you how to prepare katchi biryani.

biryani

Ingredients

For marination:

Chicken (with bone; I used drumsticks)- 2 lbs
Cilantro leaves - 1bunch(small)
Mint leaves - 1 bunch
Red chilli powder- 1 Tbsp
Green chillies - 3-4(cut into small pieces)
Ginger paste- 1 1/2 Tbsp
Garlic Paste - 1 1/2 Tbsp
Yogurt (preferably sour) - 1 cup
Cardamom powder- 1 Tsp
Shahjeera (Royal Cumin) - 1 Tsp
Cloves - 3-4
Cinnamon sticks - 3-4 small ones
Tejpatta/Indian Bay leaves -2
Salt

For Rice:

Basmati Rice - 2 cups
Salt
Cinnamon stick - 1 small
Shahjeera - a pinch
Onion (fried)- 2
Saffron milk- 2-3 Tbsp
Lemon juice - 2 Tbsp
Cashews and raisins fried - for garnishing
Ghee(clarified butter) -1 Tbsp
Oil- 4 Tbsp

biryani

Method:

1. Marinate the chicken with all the ingredients listed under the title for at least 2 hours/ overnight in the refrigerator.
2.Fry the onions and keep aside. Also fry the cashews and raisins.
3. Wash and soak the rice for half an hour.
4.Boil water in a pot along with salt,cinnamon stick and shahjeera in it. Add rice once it starts boiling.
5.Reduce the heat and cook till the rice is half done. I added 1: 1.5 , rice: water and cooked for about 8 minutes at medium heat.
6.Pour off any excess water and let the rice dry completely.
7.Pour 2 Tbsp of oil in a really thick bottomed vessel, in which you are planning to cook biryani and layer the marinated chicken.If you think the vessel is not thick enough you can keep it on a tawa on the stove top.
8.Level the top and layer it with half of the rice which is half done followed by fried onions and a Tbsp of saffron milk.Repeat this for the other half of the rice.
9.Sprinkle some cilantro leaves and mint leaves on the top.
10.Pour in a Tbsp of oil and the ghee over the top.
11.Cover with a tight lid. If you do not have a tight lid, use some dough to stick the lid and vessel tightly, so that the steam is not escaped.
12.Cook it on the high heat for the first 5 minutes, then on medium heat for 25 minutes and on very low heat for 10 minutes.
13. Wait for another 10-15 minutes before you open the lid.
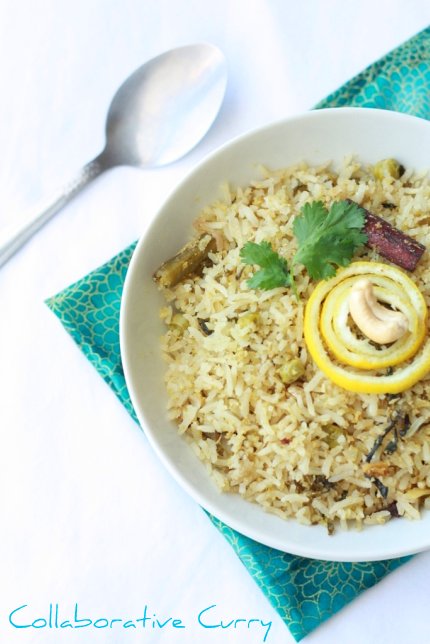
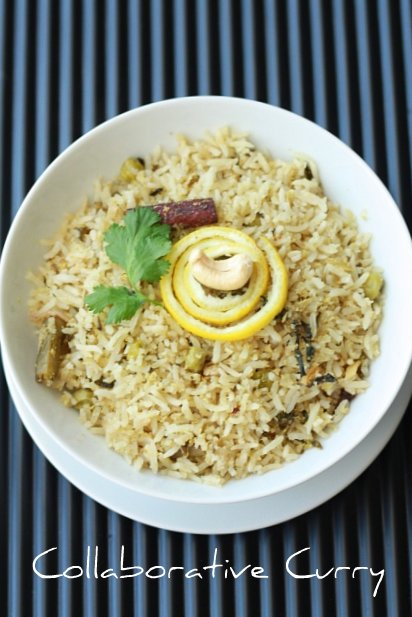
14.Mix the chicken and rice together and serve hot with raita after garnishing with cashews and raisins.(I didn't use raisins)

biryani

Notes

1.Before you marinate chicken drain the water from chicken completely.
2.If you cook the rice well initially it will get overcooked when you layer it with chicken.
3.Originally this biryani is very hot, but I have added a bit less since I have kids who cannot take that much chilli.
4.The vegetarians can replace chicken with veggies.

Tuesday, November 3, 2009

Vegetable Fried Rice

Hope you all had a fun Halloween. We had double fun since it was 'M's birthday too. Anyways he didn't play any role other than that of a wonderful Dad, but we had an angel and a lil pumpkin here. Though we had a very busy day, I wanted to make something special for the B'day boy. He likes my fried rice a lot and I thought that would make a great lunch. So, I made fried rice and baked a cake.


Veg Fried Rice


The credit for the recipe goes to my wonderful sis in laws.  I have already mentioned to you that I learned cooking after my marriage. Once, when I had some guests over and wanted to make something simple, yet delicious this rice which is always a winner in my new family came to mind. I rang up my SIL and she gave me the recipe over the phone and voila... it came out well at my first trial itself.  And now I have cooked it n times for my multinational guests and always get complimented. I have tweaked the original a bit here and there. We had it with chicken curry, fried pappad and a salad.


Veg Fried Rice

Ingredients
Ghee- 2Tbsp
French Beans- 5-6
Carrot-1(medium)
Bell Pepper(Capsicum)- 1 small
Green peas (frozen)-1/4 cup
Spring onion- 1 small bunch
Cashews-2 Tbsp
Raisins-2 Tbsp
Onion-2 small(sliced thin)

Basmati Rice- 2 cups
Water-3 1/2 cups
Lemon juice-1 Tbsp
Salt-to taste
Cinnamon-1 small stick
Cloves-4-5
Cardamom- 1/4 tspn
Tejpatta/Indian Bay leaves-2
Soy sauce(optional)-2tspn

Method

1. Wash and drain the rice and keep aside.
2. Cut the vegetables into thin pieces.
3. Fry the cashews and raisins in 1/2 Tbsp ghee and remove from pan.
4. Throw the beans and carrot pieces into the same pan and cook.
5. When it's half done add the frozen peas, bell pepper and cook for a couple of minutes. Switch off the flame.
6. Fry the onion till it turns golden brown and keep aside.
7.Meanwhile heat the pot you use to cook rice and add the remaining ghee . When it is warm add the dried rice into it and fry for 4-5 minutes on low heat.  Throw in the spices and stir.  Add salt and lemon juice into it and stir for a minute.
8. Add water and let it boil. Simmer once it starts boiling and cook covered on medium low till rice is done. It takes about 12 minutes to cook.
9.It is always great if you cook the rice in advance and let it cool a bit. The rice won't break away, while mixing then.
10. Layer the rice and the fried vegetables in this order or at your wish. First rice, followed by fried onion, vegetables, spring onion, cashews and raisins and a little soy sauce.
11. Serve with any curry of your choice and pappad. Garnish with coriander leaves

Veg Fried Rice

Contributor: Namitha