Friday, February 26, 2010

Gobi Manchurian (dry)

As Sunitha has already mentioned,  in our previous post, Chinese food always reminds us of Mangalore's Hao Ming and Hao Hao. Two restaurants most of us friends in college frequented. Little did I know that it was just the beginning.  Chinese food is a favorite around India and I have lost count of the number of chinese joints I have frequented since college times.  I am sure you will agree most of us Indians like Chinese food. A lot! So now we have invented all these Indo- Chinese dishes like Manchurian, which probably is a universal favorite. You might also have seen endless versions of Gobi Manchurian. I am no different and try many variations myself.  Nevertheless, today's recipe is one of our favorites at home and my children love it.

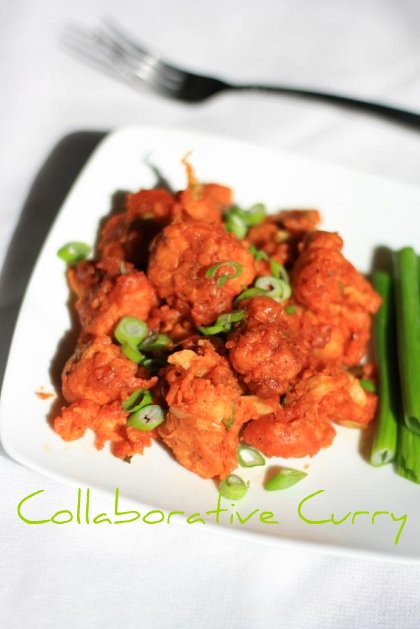
   Stir up some fun this weekend with Gobi Manchurian! If you are not a fan already I guarantee you will be.  Have a fun weekend guys! I am coming around to see what you have lined up.


Ingredients:

For fritters:

Cauliflower- Florets of 1 medium sized
All purpose flour- 3/4 cup
Corn flour- 3 Tbsp
Salt- To taste
Red chilli powder- 1 tsp
Ginger-garlic- 1 Tbsp
Oil- For deep frying

For the sauce:

Ginger grated- 2 tsp
Garlic grated- 1 Tbsp
Green chillies chopped- 2-3
White part of Green onions- 3 Tbsp
Green part of green onions- 3 Tbsp (for garnishing)
White pepper powder- 1/2 tsp
Bullion cube (powdered)- 1 (optional)
Dark Soy sauce- 3 Tbsp
Red chilli sauce- 2 Tbsp
Tomato sauce- 3 Tbsp
Sesame oil/ any other cooking oil- 1Tbsp
Salt- to taste.

Method:

1.Make a batter of all the ingredients listed under fritters, except cauliflower and oil.
2.Heat the oil for frying
3.Boil some water in a pan and dip the florets in it and boil for a couple of minutes.It should be cooked 3/4th, not fully.Drain the water completely.
4.Dip the florets in the batter and fry them till they turn golden brown in color, on both sides.
5.Drain them on a paper towel.
6.Heat a pan and pour 1 tbsp of sesame oil.Saute the ginger and garlic in this oil.
7.Now add the chopped green chillies and white part of green onions and saute for another 3-4 minutes.
8.Add Bullion cube powder,all the sauces and pepper powder and continue stirring for a couple of minutes.
9.Throw in the fried fritters into this and mix well.Turn off the heat and sprinkle with the green onions before serving.
10.Serve with hot vegetable fried rice or as it is, as a starter.


Notes:

1.To get the restaurant style manchurian you could add MSG(trade name-ajinomotto), a pinch. I don't buy MSG, since I'm not sure about the health problems it could cause.
2.You could replace the red chilli sauce with the green one, I used the former since I didn't have the later :-)

Contributor: Namitha

Thursday, February 25, 2010

Cucumber in sweet vinegar

     How are you?  I hope you are doing well.  The weather in these parts have been rather crazy see-saw between sunshine and snow.  Thankfully, yesterdays flurry din't last long on the ground and there is news that the weekend will be bright and sunny.  This is good.  It means a long walk in the woods for me.

The recipe today is a special one even though its the easiest concoction ever.  Most Chinese restaurants in India serve these on the table with pickled cabbage, soya bean sauce and ketchup.  I love it.   This is my own version of the recipe purely inspiried and concocted keeping the taste from the aforementioned restaurants in mind.  Please add more sugar or salt as needed since the strength of these, you know, depend on the brand and product. 
Cucumber in sweet vinegar
Ingredients:

Cucumber - 2
Sugar - 2 tspn
Salt - 1 1/2 tspn
Vinegar - 1/4 cup
Boiling Water - 1/4 cup
Green chillies - 2 to 4 nos
Cucumber
Method:
1. Add salt and sugar to the boiling water and once cool add vingegar
2. Slice cucumber and add to the mixture and keep overnight
Notes:

1. I don't make this to last a long time but just as a starter to a meal.
2. This way its tasty and you can do without the use of rich dips
Cucumber in Vinegar
   Great news also for me is this pretty post-it book that came in my mail the day before.  Oh! What joy!  Thank you Oraphan for this pretty lil book I adore.

Sticky Notepad

We are participating in Pari's Combo Event .  Please find her announcement here


Our Entries:
Appam
Pav Bhajji
Poori Chole

Contributor:
Sunitha

Wednesday, February 24, 2010

Neychoru with raita/Ghee Rice with Salad

Neychoru is a North Kerala specialty. To be precise it’s a North Kerala Muslim specialty. I tasted it for the first time at my friend's place and instantly fell in love. It is a rich preparation with clarified butter, cashew nuts, raisins and golden fried onions. The aroma wafting through the house while this is being prepared is enough of an appetizer. All of these qualities make it an ideal treat for our cold, cold weather. Disclaimer: This is not for the weak hearted. Literally. It is so calorie rich that if I call it "healthy" neichoru, it will be one of the best oxymoron you've ever heard.


Ingredients:

Basmati Rice- 2 Cups
Hot Water- 3 1/2 cups
Ghee- 4-5 Tbsp
Cashews- 2 Tbsp
Raisins- 2 Tbsp
Onion- 1 Big
Cinnamon stick- 2 one inch sticks
Cloves- 4-5
Cardamom seeds-From 2
Salt- To taste
Oil- For frying

Method:

1.Wash the rice and soak it in water for at least 30 minutes.Drain and keep aside.
2.Heat 1 Tbsp of ghee in a pan and fry the cashews and raisins till they turn golden brown in color.
3.Heat the pan in which you are planing to cook the rice .Pour 3-4 Tbsp ghee into it (you could reduce the amount , but the more the merrier !).Add the spices and saute for a minute and throw in the drained rice into it. Saute this for 3-4 minutes.Add salt and mix well.
4.Meanwhile you could heat/ boil the water.
5.Add the hot water into this and allow to boil on high heat. When the water starts bubbling well reduce the heat and continue cooking for another 8 minutes or till the rice is done.
6.Heat the oil for frying and fry the onion.
7.Serve the rice after garnishing with fried onion,cashews and raisins.
8.Best served with raita or chicken/mutton curry.


For Raita:

Ingredients:

Yogurt- 1/2 cup
Tomato(chopped)- 1 small
Onion(Chopped finely)-1/3 cup
Green chillies (chopped)- 2-3
Salt

Mix everything well and serve chilled.

Notes:

1.It's important to use best quality basmati rice and best quality ghee for this preparation. As you know the aroma of rice makes a huge difference to your neichoru, or biryani.
2.Also I've used home made ghee for making this and it is the best :-)

Tuesday, February 23, 2010

Appam with Potato Peas Curry

    A festive breakfast has to be palappom.  This is what you will be served if you are at my home for breakfast.  There is a special wok that is used to make this, however, since I don't have one right now I decided to improvise.  I tried my own version in a regular pan and it tasted just fine even though the pretty look was missing.  I decided since most of you won't have the wok it maybe a good idea to tell you, you can make this in a shallow pan. 
Appam
Ingredients:
Basmati Rice - 3 cups
Coconut Milk - 1 ( 13.5 oz can)
Yeast             - active dry, half of a 0.2 oz sachet
Salt - to taste

Method:
Soak the basmati rice for at least 4 hours
Grind in a blender with the coconut milk until smooth. I generally don't get a very smooth blend in my mixer so as long as its fine and you can see it bubbling you will be fine
Add the active yeast to the batter.  Generally, the dough coming out of the blender is warm and helps in activating yeast.  However, you could also dissolve yeast in luke warm water and once its active add to the batter
Leave the batter to ferment overnight.
The batter needs to be watered down if its thick.  I added almost 1 cup of water.  You could also add milk to this mixture.  Add salt.  The batter should be of a consistency which will spread in a pan when twirled around
Cover the pan and cook on medium heat for a couple of minutes
When the edges start leaving the pan appam is ready.  Gently lift it off the pan.
There is no need to flip the appam.  Make sure by touching carefully on the inside of the appam.  If it does not stick then its done.
Appam
Potato and Peas Curry:

1. Potato - 2 medium
2. Onion - 1/2 of a medium size onion
3. Carrots
4. Green chillies - 2
5. Peas - 1/2 cup
5. Chilli powder - 1 tspn
6. cummin - 1/2 tspn
7. Garam masala - 1.4 tspn
8. Ginger - 1/4 tspn chopped fine

Method:
Heat oil in a pan and add the cummin.
Add onions and saute till translucent
Add chillis, curry leaves, chillip powder and garam masala and saute
Add tomatoes and stir for a 2 minutes
Add all the vegetables and stir in well.
Transfer all of this into a pressure cooker with water to just cover the vegetables
Cook for one whistle and switch off the stove and let it stand for 5 to 10 minutes till all the pressure has escaped.
Traditionally appam is served with stew made of vegetables, chicken or lamb.


Appam

Friday, February 19, 2010

Kanjiyum payarum/Rice gruel with green gram

For people like me, 'kanjiyum payarum' (rice gruel and green gram) is synonymous with comfort food. I think its pejorative when kanji is symbolized with poverty or ill health. But it is true.  Some consider it the poor man’s food. Let me begin in defense for this hearty meal stating the cultural relevance the food has in Kerala. On Good Friday, Jacobites (a Christian denomination) after spending a day in prayer and fasting eat Kaji at church in fellowship.  The muslims, during the season of Ramdhan often break their fast with kanji and thereafter following up with their Iftar party which serves party food. I need to add, after fasting for an entire day nothing feels as good as 'Kanji and payar' as my friends say.  Hope this helps to see Kanji as an integral part of our culture. Apart from this without any religious connotation this is equally enjoyed as a dinner and some times even for breakfast by many families.  Even though kanji started being used on somber occasions or talked as food for the poor it was clearly a energy booster. It shakes off melancholy.  I know it must be the sugar kicking in but I hope I have made my case.


Now,  let’s do a comparison with soup. If you take a close look, this dish is a healthy vegetarian soup except that starch and protein are prepared and served separately and each has to make his/ her individual soup on the table. The rice gruel is served with cooked green grams spiced with black and red pepper, mustard, shallots and curry leaves. To substitute the bread, crepes, croutons etc that goes with soup we serve pappadam with the gruel. Pappadam is a thin disc or call it wafer made with black gram or urad dal. These are mostly shop bought and fried at home. You can see how spices,  plentiful in our part of the world, are incorporated to make a hearty soup. Now you know why I call it ‘comfort food.’

Ingredients :

For kanji(serves 2)

Parboiled rice- 1/2 cup
Water- 2-3 cups(there should be enough water left after cooking !)

Method:

1. Wash the rice and pour water.
2.Cook in a pressure cooker for upto 2-3 whistles or until rice is done.

For green gram/cherupayar thoran

Moong beans(green gram)- 1/2 cup
Salt- To taste
water- 3/4 cup
turmeric powder- a small pinch
Grated coconut- 2 Tbsp
Red chilli powder- 1/2 tsp
Red chillies- 2
Mustard seeds- 1/2 tsp
Curry leaves- 1 sprig
Oil- 1 Tbsp


Method:
1.Wash and clean the green gram. Cook in a pressure cooker after pouring the water and adding salt and turmeric.
2.Cook on high heat till the first whistle and then simmer and cook for 2 more whistles or at least 15 minutes.( This time period is for my medium sized cooker. This may vary for your cooker !)
3.heat oil in a pan and do the normal seasoning by spluttering the mustard and sauteing the red chillies and curry leaves.
4.To this add the red chilli powder and stir cook for couple of minutes on low heat.
5.throw in the coconut and the cooked green gram , mix well.

Serving Suggestions.

Sprinkle some salt on the kanji and mix well. Serve with green gram thoran, pappad and a pickle of your choice.Sure you will go for a second serving :-). You could serve simple gravies like pulissery with this.
While talking about pulissery I must say that the kanjivellam (water in which rice is cooked) when mixed with some pulissery and a pinch of salt makes a healthy summer drink.

Thursday, February 18, 2010

Awards and a Plantain Treat

   We are glad you are visiting us and leaving your valuable comments.   Some of you take it up a notch and reward us and its time to acknowledge your kind gesture.  Here are some lovely ladies who awared us in the past month.  Please click the highlighted link to visit their sites to see and enjoy their space.  Each one of them have taken time to share recipes, tips and tricks from their kitchen.   There are pearls of wisdom to be gleaned from all over the internet and this small blogging fraternity is not behind.  Enjoy your stay here and hope you have a nice day.


Vinolia of Akkal's sappadu has shared "i love your yummilicious blog " award.
Same award from Nithu Bala of Nithu's kitchen
Cicily of "Spices from Queen of Arabian sea" has shared both yummylicious blog and kreative blogger
Aparna of Ladies special adukkala shared Kreativ blogger
Fathima of Thattukada has shared
Beeautiful blogger, cheerleading blog and happy 101
Soumya of Dew has shared a "smart food blogger " award
Sara of Vazhayila and Neethu from Kitchen Express has shared "blog lovin " and "smart food blogger " awards
Aruna of Aruna's Taty bites has shared Beautiful blogger, Kreativ blogger, Cheerleading blog, Smart food blogger, Happy 101, Blog lovin award
Saveurs Et goumandises has awarded Neno's award
Vineetha of Ruchi has shared Smart food blogger award

Plantain Fritters

Ingredients:
Plaintain - 2
All purpose flour - 2 cups
Water - to make a thick batter
Salt - to taste
Oil - for deep frying
Plaintain Fritters

Method:

1. Heat oil in a pan
2. Cut the plaintain in half and make three slices lengthwise
2. Mix the flour, water, salt and turmeric if you like yellow color for the batter
3. Dip the plaintain slices in the batter and once coated drop in the hot oil and deep fry

Contributor: Sunitha

Wednesday, February 17, 2010

Sun-dried Tomato Bread

  Bread making is therapeutic.  If you love the feel of dough and the gentle but firm kneads that work rhythmically it is quite satisfying endeavor.  The best part for me is the aroma that fills the house while baking the bread.  Divine.  Sometime back Sunitha made this bread, but she never took any pictures.  We decided whoever makes it next will take the pictures and share it with you and here you are. This bread is tasty to eat as it is.  Nevertheless, please do try different ways to enjoy this with a dip, soup or sandwich with your favorite meat or vegetables.  Either ways it is sure to tingle your taste buds and make you craving for more.

  Can I tell you how my 2 year old is?  Mine has got his motor skills improved and he is running riot in the house.  Banging vessels, imitating his sister in everything he says, energetic and active pursuing new all the time.  He is a handful.  I don't know how but he randomly gets the keys on the the keyboard and the control panel on the screen never in one place.  The worst was when he silently crept close to the socket and tried to dig in two plastic bands used for securing packets and wires etc.  Of course the sockets are all child protected but his curiosity is something else.  If someone asks me to run the marathon now I will win because I literally fly around the house saving a pan that is flying all over the house or rescuing him from that scientific discovery he is intent on making.
  He escapes all the time with his charming smile that says I know you don't like me doing this but mom I am just discovering the world.  Hope you have some fun today and enjoying yourself even if is just running around the house in your pyjamas with your 2 year old. 


Ingredients :

Bread flour- 4 cups
Yeast- 1 1/2 tsp
Water- 1 1/2 cups
Milk, lukewarm- 2 Tbsp
Basil/Thyme/Rosemary (dried)- 1 Tbsp
Sugar- 1 Tbsp
Salt- 1 tsp
Olive Oil(you could use the same oil from the sun dried tomato bottle)- 1 Tbsp
Sun dried tomato- 1/3 cup


Method:

1.Dissolve the yeast in the lukewarm milk and let it sit for a couple of minutes.
2.Whisk together the flour, salt and sugar in a large mixing bowl.
3.Add the sun dried tomato, basil and mix again.
4.Pour the milk-yeast mixture and slowly add water and mix well.
5.Transfer the dough to a floured surface and knead using your hands. Knead well for 5 minutes.
6.Cover the dough and let it rise in a warm place for 40 minutes.
7..Take out the dough and knead to remove the air formed in.
8.Cover it and keep it back again in the warm place for another 40 minutes.
9.Press and knead the dough again, and divide it into 2. Cover and let it rest on the floured surface for 20 minutes.
10.Shape the dough into 2 rectangles that are about 6 by 8 inches in size.Make sure that the thickness is even in all places.
11.Let it sit covered for the third and last time in the warm place for another 40 minutes.
12.Preheat the oven at 425 degree F.
13.Make scores on the dough using a greased knife or razor blade and bake for 25 minutes or till the top turns a nice brown color and you hear a hollow sound when you knock on the top.
14.Cool on a wire rack.


Notes:

1.If you like the tomato flavor on the higher side you could add 1/2 cup sun dried tomato.
2.This is quite time consuming, like any other yeast bread recipe. So you may want to plan in advance.
3.My scores didn't come out perfect :( I need to practice more :-)

Recipe adapted from :Baking at home, CIA

Contributor: Namitha

Sugar Cookies

   Visiting your blogs confirmed to me that most everyone had a good time on Valentines Day. This is very good and I want to report I had a good one too. Maybe my children enjoyed it a tad bit more, what with the funky colorful cookies and all, but I had a good time making it, seeing their excitement, which in turn pleases my DH quite a bit. Now you can see how one thing led to the other setting a ripple of joy.
   My daughter had been hounding me to make cookies. Like most mothers, I give in when I see passionate persuasion. She was bursting with ideas of how she will decorate it and what color to use and I have to say, I am quite pleased with the results myself. Don’t children amaze you with the clarity of their thinking? I sometimes wish I knew as clearly about what I want like my kids. I am pretty strong willed mind you but my daughter beats me hands down.
  She absolutely loved the icing and the cookies. My toddler son also enjoyed them, though he doesn't have a clue about Valentine's Day. I am thinking it’s the color and sprinkles on the icing but either ways he was jumping as excitedly at the whole affair as his sister.  Now it’s your turn, make some colorful spunky cookies and let’s beat this post Valentine’s Day blues. Let the party begin!


Ingredients:
For Cookies:

Flour- 1 1/2 cup
Baking soda- 1/4 tsp
Baking Powder- 1/4 tsp
Salt- a pinch
Unsalted Butter- 1/2 cup
Granulated sugar -1/3 to 1/2 cup
Egg- 1
Pure Vanilla Extract- 1 tsp

For Icing:

Confectioner's sugar- 1 1/3 cup
Light corn syrup(Karo)- 2 Tbsp
Milk- 1 Tbsp
Vanilla extract- a few drops
Food color


Method:

1.Combine the flour, Baking soda, baking powder and salt well, by sifting.
2.Beat the butter and sugar until soft and smooth.
3.Beat in the egg till it is incorporated well.
4.Pour in the vanilla extract and beat in to mix.
5.Mix the dry and wet ingredients together and flatten the dough to form a disc and keep chilled for at least 30 minutes.
6.Preheat the oven at 350 degree F and line 2 baking trays with parchment paper.
7.Take out the dough from the refrigerator and roll it out on a floured surface.
8.It should be about 1/4 inch thick.
9.Cut the rolled dough using a cookie cutter and lay on the baking tray.
10. Keep this in the refrigerator again for 5-10 minutes and bake for 10-12 minutes or until the sides start turning golden brown.
11.Cool them on a wire rack.
12.For the icing,combine all the ingredients well. If the mixture is too thick add little more corn syrup and a few drops of milk.
13.Spread this on the cookie and let it dry. (this may take a couple of hours, depending on the amount of water content).


Sending this off to Priya's Hearts for St.Valentine's event.

Tuesday, February 16, 2010

Fish n Mango

  With the long weekend over its taking me time to get back into my routine.  I will expressly finish my ramblings and get to the point today.  I made some fish which is pretty easy to cook and yet satisfying to the taste buds. I especially like this way of cooking fish with mango because it changes an everyday dish for me into a special one.  So, if you are like me and like fish made in Kerala style and yet want to make it a little different the best way is to change the ingredient that gives it it's tang.  You can change the kokum to tamarind, tomato, mango or Irumban puli.  The English names for tree bearing Irumban or Ilimbi puli nbsp;are cucumber tree, tree sorrel etc.

  Wish you Happy Mardi gras, Fat Tuesday or whatever name you call it.  I almost forgot about but last year same time is when I started making bread in a big way.  If you would like to read about what I did last year you can find it here
Fish n Mango

Ingredients:
Fish - 3 fillet (I used tilapia so any two fishes maximum of medium size will work well
Mango - 1 cup diced
Coconut - 1 cup grated and crushed by running in the mixer once
Green chillies - 2
Chilli powder - 1/2 Tbspn
Shallots - cut into four pieces 1/2 cup
Mustard - 1/2 tspn
Turmeric - 1/2 tspn
Ginger - 1 tspn Chopped fine
Garlic - 1/2 tspn (optional)
Fenugreek powder - 1/4 tspn
oil - 2 tspn

Fish n Mango

Method
1. Heat oil in a pan. Add mustard and when it splutters the shallots, ginger, garlic and curry leaves and stir around for a 3 - 4 minutes
2. Add the rest of the ingredients and 1/4 to 1/2 cup water and let it cook for a while till the water drains and the fish and mango is cooked.
3. Serve with rice and gravy of your choice.

Contributor: Sunitha

Friday, February 12, 2010

Mahogany cake and Happy Valentine's day

Maybe it’s just a Hall mark holiday, but whatever it is Valentine’s Day reminds me of love and roses.  Both being beautiful I cannot help but take joy. Some may choose to sit at home and crib about commercialization and the utter waste of paper with so many cards being sent out. The stories behind it I agree are embroiled and ploughed deep in mire.  Nevertheless, how can you cast aside something that symbolizes love.  Say, even if it may have taken form from the great poet Chaucer's imagination.  I cannot.


From Collaborative Curry we would like to wish all our readers a Happy Valentines Day. Hope you get to spend your time with loved ones, counting your blessings. These should be everyday practices, no doubt, and not just assigned to one day. Either ways, it makes good sense to celebrate yesterday, today and tomorrow and why not on Valentines Day, Love. Hope you all have a good time celebrating the love in your life.

  To our blogging buddies we share this Mahogony cake and a peek into some red roses hovering behind celebrating bloggin and the love for it.  Smiles!


Ingredients:

For cake :

Sugar- 1 cup
Butter- 1/2 cup
eggs- 2
Instant Coffee Powder-2 tsp
Cocoa Powder- 2 Tbsp
Buttermilk- 1/2 cup
baking soda-3/4 tsp
Hot water- 2 Tbsp (for dissolving coffee powder)
Flour- 1 1/3 cup

For Mahogany frosting :

Butter- 1/2 cup
Confectioner's sugar- 1 cup
Instant coffee- 2-3 tsp mixed in 2 tbsp water
Cocoa powder- 2 Tbsp
Vanilla extract- 1 tsp


Method;

1.Preheat oven to 350 degree F. Grease and flour a 9 inch cake pan.
2.Sift the flour and baking soda together.Beat butter and sugar until smooth and fluffy.
3.Beat in eggs ,one at a time.
4.Dissolve the coffee powder into the hot water and let it cool.
5.Mix in the cocoa powder and coffee into the mix.
6.Stir in the buttermilk into this
7.Fold in the flour and pour the batter into the prepared pan.
8.Bake for ~30 minutes or until a skewer inserted into the middle of the cake comes out clean.
9.Let it cool for a while and take out and keep on the wire rack to cool it completely.
10.Cut the cake to make 2 layers.
11.Prepare the frosting by mixing together all the ingredients.
12.Apply the frosting on the bottom layer using a butter knife.
13.Keep the next layer on the top and apply the remaining frosting on top and also on the sides.Let this cool well.Grab a piece and enjoy !

Recipe Courtesy: allrecipes.com

Notes:
1.The frosting may get solidified in between. Keep it in the microwave for some time and it will be gooey again.
2.If you like strong coffee flavor in cakes you could add the strong brewed coffee instead of instant coffee powder.

Thursday, February 11, 2010

Home made Paav with Paavbhaji masala-The most popular streetfood in India

  Bad weather has its own share of positive; it’s the best time to bake. I have been flirting with the idea of making pav bhaji for a while, and after trying out Sunitha’s recipe for bun and their whooping success it was inevitable. I shaped them into paav and made a hearty portion of bhaji which was received with a roar of excitement by my girl. Well, my daughter needs her share of experiment with the famous street food of India, won’t you agree?
Paavbhaji
I have enjoyed street food and am still very fond of them, like you can see. Pav bhaji tops the list. The pani puri, masala pav etc are all equally good and they all bring back a flood of memories. Times with friends. Money was difficult to come by those days but there was always enough for a plate of pav bhaji. Hot off the stove, enjoyed on a cool evening after the nasty heat spell of the day. Wash it down with some sugarcane juice and voila it’s the perfect fix.

For Paavbuns

 Follow our recipe here.  If you do not have White Lily flour you can also make them with the following differences.  When you keep making breads you will discover how to make your own changes.  We wanted to tell you this so that you may dare to experiment and come out with successful results every time you make bread.  Please feel free to ask us in case of questions.   

Tips:
1.All purpose flour and bread flour in 1:1 ratio.
2. More water, and less milk, making the final water content the same.
3.When you reduce the fat content you can use less yeast, say for ~7 cups of flour ,I only used 2 packets of yeast. ( yes I made a bigger batch this time !)
Paav bun

For Paavbhaji masala :

Ingredients:

Onion- 1
Garlic crushed- 5-6cloves
Tomato- 1
oil-2 tbsp
Frozen green peas- 1/2 cup
Bellpepper(finely chopped)-2 tbsp
Potato- 1
Cabbage- 1 small piece
Cauliflower florets- 1/3 cup
Beans- 4-5
Carrot- 1 small
Paavbhaji masala- 2 tbsp
Red chilli powder- 2 tsp/acc to your spice level
Butter- 2-3 Tbsp
Criander leaves- for garnishing
Lemon wedges-for serving
Finely chopped onions-For serving

Method:

1.Coarsely chop all the veggies except green peas and bell pepper and cook them in a pressure cooker with a little water and salt.If you are planning to cook on steam then chop them finely.
2.Heat oil in a pan and saute the finely chopped onions.
3.When it starts turning golden brown,throw in the crushed garlic and saute till the raw smell leaves.
4.Now add the chopped tomatoes and saute till the oil starts leaving the sides of the pan.
5.throw in the green peas and chopped bellpepper into this and saute well.
6.Add the masala powder and chilli powder and stir till the raw smell leaves.
7.When the veggies are cooked mash them well and pour it into the masala mixture.
8.Stir well and add little more water if required.
9.Boil this and cook for 8-10 minutes on low heat.
10.Add the butter and stir well.
11.Serve warm with sprinkles coriander leaves on top.
12.It is bettr tokeep the pan on a low-heated stove while you serve it with hot paav buns.
13.heat a pan and apply butter, keep the paav buns, that is cut into halves with cut ends facing the pan. Take out and serve warm with the paavbhaji masala.
14.usually we also serve some chopped onions and lemon wedges sprinkled with chopped coriander leaves with the masala.

Paavbhaji


Contributor : Namitha

Wednesday, February 10, 2010

Fish in Coconut gravy

The man on a black ferry (vallom, vanji) would paddle by my grand parent’s home to sell fish. I am talking about 1980’s. I used to love running all the way to the river bare footed, straight out of bed, with tousled hair and a puffy morning face to watch the spectacular display of fish on his boat. He would have some sea and fresh water fish. Sardines and mackerel from the sea and a myriad of fresh water ones. Of course, he would be carrying only a few varieties at a time but would bring something different every day.

There would be some haggling for the prize and then ‘mamachi’(that’s what I called my maternal grandmother) would settle for some prize and she we would walk back with her earthern shallow pot (chatty) brimming with fish and an excited me bobbing up and down beside her. I still remember her chattayum mundum with the fan gathered behind the way this is worn. The smell of her crisp, white, lightly starched, sun dried clothes is still fresh in my memory. She had peppered hair gathered back in a bun and wore a beautiful rosette designed earrings studded with crystals and long gold chain with a prominent cross sign.  She would tell me whever I fiddled with her earrings or kept looking at them admiring that I can have it when she is gone.  I am her eldest grand daughter and I own the earrings now.

   We would sit outside on the pebbled courtyard with the fish, to clean them. She on a low stool (called korandi) and me squatting close by listening to her stories and closely watching her trim the fins and tail dexterously off the fish and lay them into a clean pot nearby. There would be a whole lot of cleaning rubbing it on stone and then twirling it around in the pot with rock salt until she was satisfied. Karthiyani (her help) would quickly grind this peach colored coconut gravy on the stone swaying her whole body forward and backward. Her grinding style was a joke because only she moves like that with the stone all the others learned the trick of holding the body still and just moving your hands to get the job done.

  Fish in coconut gravy

Anyways, today I have the fish fillets, store bought grated coconut which my grinder will help me blend in no time to cook the same curry. I am thankful for the conveniences but the memories of those days and the taste of evenly ground coconut can never be replicated. Or maybe it’s my grand mother’s love that I am missing. On days when I feel home sick I pick up the phone, call my mom or aunt, figure out some old recipes and concoct them and feel instantly at home. Here is a simple yet delicious fish curry my family makes mostly with fresh water fish but now we use all kinds. Hope you enjoy it as much as I do.

A dried fruit I have used,kudampuli(Gambooge- Garcinia gummi-gutta), gives the sourness to the curry. Please click on the link to read more about it. The tartness the kudampuli lends is what makes this dish stand apart from similar dishes made with tamarind or tomato. I have no words to describe the taste but just say if you like coconut gravy chances are you will enjoy this too.

  I couldn't help but get carried away with my memories talking about this fish curry.  Click on the links to see pictures of the vallom and chatta and mundu if you do not know what I am talking about.  Also, the curry is not peach in color because I forgot to add chilli powder while grinding the coconut.

Ingredients:

Tilapia Fish fillet    - 4
Coconut               -  1 cup
Water                  - 1/2 cup
Red chilli powder - 1 tspn
Green Chillies      - 4 nos
Ginger                 - 1/2 Tbspn
kudampuli               - 2 pieces washed and soaked in 1/4 cup water
Garlic                  - 1 - 2 pods optional
Curry Leaves      - 1 sprig
Salt                     - to taste
Fish in coconut gravy
Method:

1. Cut the fish fillet in two
2. Grind chilli powder, turmeric, garlic and coconut to a fine paste
3. Mix the fish and all the other ingredients together and cook on medium high heat to bring to a boil and then simmer on low till fish is cooked

Notes:  You may grind the ginger to a paste as well I prefer to have it in pieces
2. You may do a tempering with coconut oil or oil of preference with mustard, shallots, dry red chilly and curry leaves
3. You could use kokum instead of "kudampuli", they have similar taste, being from the same family.

Contributor: Sunitha

Tuesday, February 9, 2010

Beetroot Pachadi/Beetroot in yogurt and coconut gravy

     Hope everyone in the Mid-Atlantic States is coping well with the blizzard. Watching all the snow in the news and outside my window I can’t help but say “stay warm.” In Colorado, snow is common during this time of the year and we have accepted it as part of life. But for people not used to it, you must have read all the warnings and heard about it on TV, I just wanted to say beware of the black ice. Formed from melted ice they form a thin sheet on the roads. They are deceptive to the eyes reminding me of the saying ‘devil in disguise.’ They look like water but they are way too slippery than you think. Well, I'm sure you are aware of these things, but just couldn’t help but say a word of caution. I am especially sensitive to the subject today because I heard of a very bad accident that happened to a dear friend.  I am writing this a little emotionally distort at the way things went haywire at her place in a fraction of a second.  Hope you will forgive my ranting.  One can never be cautious enough and I believe can't have get enough reminders.

    Guess I've bored you enough lets get to the business at hand, today's recipe. I love all kinds of pachadi. Among all of them, I love to see beetroot pachadi, of course, for its eye-catching color. The majority at home doesn't like pachadi, I make it once in a while to quench my craving. It's very simple, healthy and can be kept for days.

Beets pachadi

Ingredients:

Beetroot grated - 1/2 cup
Green chillies(finely chopped)-2
Salt
Grated coconut-1/4 cup
Cumin seeds- 1/4 tsp
Yogurt/curd- 1/3 cup
Mustard seeds (crushed)- 2-3 Tsp

For seasoning:

Coconut oil- 2 tsp
Mustard seeds- 1/2 tsp
Red chillies-2
Curry leaves- 1 sprig

Method:

1.Grate the beetroot.
2.Chop the green chillies into round and fine pieces.
3.Keep these together with a cup of water to cook. Add salt too.Cover and cook on low heat.
4.Meanwhile grind together the jeera(cumin) and coconut.(add minimum water)
5.When the beetroot is done(takes about 10-15 minutes) mash it with a spoon.
6.Heat oil in a pan and do the seasoning with mustard, red chillies and curry leaves.
7.To this add the coconut mixture and crushed mustard and saute till all the water is dried out. The time depends on the amount of water you add for grinding coconut. (Takes from 3-6 minutes approx)
8.Add this to the cooked beetroot and mix well. Cook this for 2-3 minutes with the lid on.
9.Switch off the heat and remove the pot from stove.
10.Beat the yogurt with a spoon and add this to the cooked mixture and mix well .Check the salt.Pour into the serving bowl.
11.Serve with rice along with dishes like Spinach thoran and moru kachiyathu.

Beets pachadi


Contributor: Namitha

Monday, February 8, 2010

Hoisin Chicken

The gloomy weather shows no signs of letting up. The weekend was misty , murky and mundane except for some hoisin chicken I made. Doesn’t that sound like fun? Yes it was. The other day, I saw some pictures of hoisin chicken in Peanutts blog and drooled.  Instantly decided I need to try this sauce. I picked up a bottle on my regular shopping fix at the grocers and I have to say, not disappointing at all! Let’s try a positive statement. It‘s exquisite!

The recipe on Peanutts blog called for steaming the chicken but I did my own thing. Her recipe looks scrumptious and was helpful to understand how much of the sauce I can add without totally messing up. Please click on the highlighted link to reach her page.

If there are any authentic ways of cooking with hoisin sauce I am in the dark of the same.  Today’s recipe has nothing to do with authenticity but a lot to do with fun, both cooking and eating.

The chicken was marinated for a couple of hours and stir fried with vegetables that I picked up on random from the refrigerator. They were the misplaced, running around kinds who were looking lost in my vegetable tray, needing help. I spruced then up with some trimming and tossed in. Following, I thickened the sauce,  pouring over the cooked chicken and vegetables and sprinkling with sesame seeds to close the deal.

Hanoi Chicken

Ingredients:
Chicken Breast - 2
Green chillies    - 4 nos
Capsicum red and green (Bell Peppers)         - 1/2 cup diced
Cabbage          - a couple of leaves torn
carrots              - 1/2
Hoisin sauce      - 3 Tbspn
Oyster sauce    - 2 Tbspn
Soya bean sauce - 1 - 2 Tbspn
Sesame seed     - to sprinkle on top (approximately 1 tspn)
Oil                     - 2 tbspn
Ginger                - 1 Tbspn thinkly chopped
Garlic                 - 1/2 Tbspn chopped
Corn starch        - 1 Tbspn
Water or Chicken broth - 1 and 1/4 cup
Hanoi Chicken

Method:
1. Marinate the chicken in 1 tbspn hoisin sauce, 1 tbspn oyster sauce and 1 tbspn soya bean sauce for 2 hours or freeze it till you want to use next
2. Heat oil in a pan and stir fry the chicken with ginger and garlic till cooked
3. Spoon them out and in the remainting oil proceed to saute the vegetables like bok choy, cabbage, bell peppers, broccoli, cauliflower etc.  I have used cabbage, bell peppers and carrots.
4. Add some more of all the three sauce just enough to spice up the vegetables.  Just a little is fine.
5. Once they are cooked al dente throw back the chicken and cook them all together and transfer into your serving dish
6. Add a cup of water and all the three remaining sauce and bring to a boil.  Add the corn starch dissolved in 1/4th cup water and add to the boiling sauce.  Thicken and add to the prepared chicken and vegetables and sprinkle with sesame seeds
Hanoi Chicken

Notes:
1. All meaurements are approximate
2. Avoid or reduce green chillies.  I like the dishes hot and add quite a few chillies.  This one was quite piquant so reduce the no of chillies if you like your dish mild.
3. I like cabbage, bok choy, peppers, broccoli or cauliflower, celery, scallions etc in the chinese style dishes I make. I have never used potatoes for example in these preparations and so cannot vouch for it going well even though I tend to loosely state add vegetables of your choice.

Friday, February 5, 2010

Pineapple Pulissery (Pineapple in coconut paste and curd)

Pulissery is a staple in Keralacuisine, and the natives do not need any introduction for this.In fact moru kachiyathu is the sister/brother of this and the only difference is the coconut cumin paste in pulissery.  People often confuse this with "kaalan", but both are different and the recipe for "kaalan" will be posted soon :-)

I make this almost every week, which will last for 3-4 days and my family needs it even if I have some other curry.This is a very simple, healthy and tasty preparation which is comforting too. 

pulissery

Ingredients:

Pineapple (cut in small cubes)-1/2 cup
Greenchilles(slit into 2)-3-4
Turmeric powder-1/2Tsp
Red chilli powder-1/4tsp
Salt-1 1/2tsp
Coconut(grated )-2tbsp
Cumin seeds-1/4tsp
Yogurt/curd(sour)-1 +1/2 cup
Water-1cup

For seasoning:

Coconut oil-1Tbsp
Mustard seeds-1/2 tsp
Fenugreek seeds-1/2tsp
Red chillies-3-4
Curry leaves-1sprig

Method:

1.Cook the pineapple cubes in enough water to immerse them completely after adding turmeric,green chillies,red chilli powder and salt.Cook for 15-20 minutes.(Pineapple needs 5 more minutes)
2.Grind the coconut and cumin seeds together to a fine paste.
3.Mix this paste in the cooked pineapple mix and cook covered for another 3-4 minutes.
4.Meanwhile blend the curd or yogurt using a whisk or hand mixer.
5.Add this into the mixture slowly while stirring with one hand.Adjust the consistency using water.
6.Stir continuously,and when you see the steam starts coming switch off the heat and pour into the serving dish.(This shouldn't take more than 3-4 minutes.If you keep longer it will get curdled)
7.Heat oil in a pan and do the seasoning.(when mustard seeds splutter, add fenugreek seeds, wait for that to splutter and reduce the heat, add red chillies and curry leaves)
8.Pour this seasoning over the pulissery and serve with Rice.

pulissery

Notes:
1. You could use ripe mango,wintermelon, nendrappazham (Kerala plantain) etc instead of pineapple to make pulissery.
2.If you are using buttermilk ,don't add any extra water.
3.When you add water to adjust the consistency, keep in mind that, later it gets more thickened, by the cumin you have added, and water should be a little bit on the higher side.
4. The camera/lighting didn't do the justice and I got a lighter color in the picture. In fact it is more yellowish :D

We are happy to send this to Priya's CWS-Fenugreek seeds event which is hosted by SE. We would like to thank you both for this exciting event :-) Click on the link to know more about this event !


Contributor: Namitha

Thursday, February 4, 2010

Poori and Chole/Indian fried bread and chickpeas curry

There used to be an advertisement on TV while I was growing up in India the lyric “Sundrop super refined sunflower oil…….,” While the jingle plays, a boy summer-saults into the kitchen; where his mother is bringing a plate laden with beautifully round pin cushion like pooris. She dodges around him with the plate and a poori runs down, the boy leaps rescuing it. The jingle continues “…..the healthy oil for healthy people!” I would run to the TV to watch this ad every time it came on. It’s not just the advertisement that got me liking the pooris. I can say this with surety because, if you remember oil is marketed.  Poori which is loved universally and especially by kids is the bait. At least that’s what I believe.
Poking fingers on the crispy top, seeing it crack under your finger’s pressure, steam rising bringing with it the aroma of the light oil and whole wheat are all part of the joy of eating pooris. It helps creativity on table if you like it! I say! Why I say that is because, some of us open the thin layer on top carefully and fill the chana or potato bhajji inside, and eat them like you would a greek gyro sandwich made with pita bread. However, the top is flimsy thin so not as sturdy as the pita bread. Like I said, this is something fun you can try for fun.

So where were we? This is a fun, tasty breakfast or dinner as you please. I have shared below the way I cook them and I hope you will enjoy this as much as my entire family does.

Puri

FOR POORI

Ingredients:

Wheat flour- 1 cup
Semolina- 2 Tsp
Salt- to taste
Boiling water- 1/2 cup + 1 or 2 tbspoon depending on the flour
Oil- for deep frying

Method:

1.Mix wheat flour, semolina and salt in a mixing bowl, preferably a steel one.
2.Boil the water in a pan and add to the flour mixture, right from the stove top. Mix well using a big spoon.
3.Once it is cool enough for your hand, knead well using your hand.Cover the bowl and keep aside for 20-30 minutes.
4.Heat the oil for frying on medium to medium high.
5.Make small balls of dough and roll out using a rolling pin.To avoid stickiness you could dip one end in oil before rolling out.
6.Once the oil is hot enough slide in the poori in oil and fry , while flipping the sides using a slotted spoon or skimmer.
7.When it starts turing slightly golden brown, take out and keep in a plate that has kitchen towels/tissues to remove excess oil.
8.Serve with channa curry/chole or any side dish of your choice.

Chole

FOR CHOLE/CHICKPEAS CURRY

Ingredients

Chickpeas- 1/2 cup
Blacktea- 2 cups (2 tea bags)
Turmeric powder- 1/4 tsp
Onion- 1/2
Tomato- 1/2
Chole masala- 1-2Tsp
Cumin powder- 1/4 Tsp
Coriander powder- 1 Tsp
Chilli powder- 1/2 Tsp
salt- to taste
Oil- 2 Tbsp
Coriander leaves- for garnishing

Method:

1.Wash and soak the chickpeas for 8 hours or overnight in black tea/water.  Soaking in black tea adds to the color and flavor.  This step is optional you can soak it in just water too.
2.Add turmeric and salt and cook in same water.
3.Grind onion and tomato to a fine paste.
4.Heat oil in a pan.Saute the tomato onion paste till it is done and oil start leaving the sides of pan.
5.Add all the other spice powders and saute till the raw smell leaves.
6.Pour in the cooked channa to this and mix well.
7.Boil theis and lower the heat and cook covered for at least 15 minutes.Adjust the water while boiling.
8.Serve with coriander leaves sprinkled on top, as a side dish for roti, chappathi, rice or poori.

Chole

Notes:

1.If you are not too calorie conscious, add a teaspoon of butter or ghee while making the poori dough.This makes it even softer.
2.If you do not have chole masala, add more of cumin, coriander and chilli powder and it will be fine.

Contributor : Namitha

Wednesday, February 3, 2010

Garam Masala

Garam Masala translated loosely garam = hot, masala = blend of spices is called for in many Indian recipes. The word masala is commonly used today even when talking about bollywood movies, even if only metaphorically. The movies are packed with melodrama, songs and action making it a mixture unable to classify into any specific genre like we can with English movies as romantic comedy, actions thriller etc. The way we cook is kind of a medley too. We throw in hand full of this or a pinch of that and hence a well made dish is attributed to one’s ‘kaipunyam’ like ‘green thumb’ is for gardening.
If you go through Indian cook books you will see time and again introductions or foot notes stating that there is no exact measurement for cooking but you play by ear. Well, as much as it is true when I started cooking I found this axiom quite difficult to follow. Thereof, this recipe is an ambitious one trying to get down to exact measurements. This masala works well for me and depending on my dish I sometimes add a black cardamom, bayleaf or star aniseed as needed.
I am hope you will enjoy the freshly ground garam masala.

Garam Masala
Ingredients:
Fennel Seeds - 1 Cup
Cinnamon - 3 - 5 nos, 2 inch piece
Cardamom - 1/4 cup
Cloves - 1/4 cup
Whole black pepper - 1 tbspn

Method:
1. Heat a pan and add each ingredient and stir for a couple of minutes and move into a plate
2. Powder all of them together and let it cool
3. Save it in a air tight container.
Garam Masala

Notes:
You can use this as your basic masala for egg curry, chicken curry, vegetable curry etc and also throw in other whole masala depending on the dish.

We are participating in the JFI: Fennel seed event run by Siri started by Indira.  Please click on the links to see for yourself and participate.