Showing posts with label Valentines Day. Show all posts

Tuesday, February 14, 2012

Red Velvet Cake Pops

Happy Valentine's day everyone ! Hope you are having a beautiful day, with your loved ones,whether you celebrate this day or not. As I have told you before, this day is like any other day for me and my DH, everyday being Valentine's day. Ok, I agree that we have our not-so-good days, just like any other sane couple in the world,but there is always love,no matter what kind of day it is.Said that, I'm going to paint this space pink today,for you all !

Red Velvet Cake Pops

We celebrate this day for the kids.They love all the goodies I make,and home-made valentines they get to share with their friends.For lil imp,this is the first Valentine's day celebration with his friends at preschool. Every year I think, I get the ready made valentines and cards for the kids to share with their friends. But, the fun of making them at home, with kids, is priceless ! So,as always,we as a team, made valentines for 5th graders and preschoolers, at home this time as well.This time we made some lovely bookmarks, with Tattoos for the boy and with chocolates for the girl,for sharing with their pals.

Friday, February 11, 2011

Red Velvet Cake

So, what are your plans for Valentine's Day? Stay in and cozy up or go out and paint the town red?  Whichever, I hope this red velvet cake will bring a smile to your face.  This is a great cake with its color and rich taste which will be a surprise for your special one.

   As for me, I treat the day as any other. If that sounds cynical, blame it on my husband who does not give a hoot about Valentine’s Day.  Another festival lost to capitalism and conjured up by Hallmark is what he will say. Oh Well!  That sure doesn't mean I can't eat this cake, right?

Red Velvet Cake


But I have some good memories of this day.  More like quirky, fun-filled ones.  We had some strange happenings in our college around Feb 14th.  Some guys came up with a club called ALFA! It was a big deal those days, and this club only gave entry to young men.  As for us girls, (I don’t write young ladies by choice) we were happy giggling and gossiping.  Questions that reigned supreme in our conversations were “Who will be given Valentine’s day cards, who will get flowers, and who the hell will be proposed to.  Oh! We discussed it endlessly and sought great entertainment from it.  I know I sound antiquated but hey, it’s my life.

Red Velvet Cake

In the mean time, the men folk, especially ALFA seemed to be in a flutter on the 15th.  You ask why after the big day?

Well, ALFA stands for Aloysius Love Failure Association.  The club just grew out of proportion enough to break at its seams on this day.  We girls were too prim and proper (at least to the public eye), and gave those boys a run.  We were playing hard to get!


Those were the days! 

Red Velvet Cake

(Remember the old Will Filter Cigarette ad? The slogan read “‘made for each other, filter and tobacco perfectly matched – Taste that truly satisfies time after time.”)

Disclaimer: I do not like smoking and neither my husband nor I smoke.  This is just metaphorical, I like the ad slogan.

Should I tell you anything about the cake?  Take my word for it; it’s the best cake for the day! Red velvet and Valentine’s Day – Made for each other.

Okay! Don’t throw things at me now.  I am done talking!

Red Velvet Cake


For the cake:

Flour- 2 1/2 cups
Baking soda- 1 tsp
Eggs- 2
Sugar- 1 3/4 cups
Oil- 1 1/2 cup
Buttermilk- 1 cup
Milk- 3 Tbsp
Cocoa powder- 2 Tbsp
White vinegar- 1 Tbsp
Pure Vanilla Extract-1 tsp
Red food color- 2 oz


Cream Cheese frosting:

8 oz. cream cheese, room temperature
1 cup butter, room temperature
1 teaspoon vanilla
6 cups confectioners’ sugar

Method:

1.Preheat the oven at 350 degree F. Grease and flour two 9 inch pans.
2.Lightly beat the eggs.
3.Add the other wet ingredients and mix well.
4.Whisk together the dry ingredients.
5.Mix the dry ingredients into the wet ingredients by beating everything together for a couple of minutes.
6.Divide equally among the pans and bake for about 30 minutes or until a tester inserted comes out clean.
7.Cool completely on a wire rack.
8.Meanwhile make the frosting by mixing everything together. Start with the cream cheese and butter at room temperature.
9.Frost one cake on the top and keep the other one on top.Frost on the top and the sides too.
10.Refrigerate any left overs.

Red Velvet Cake

Contributor: Namitha
Recipe adapted from : Bakerella and here

Wednesday, February 9, 2011

Raspberry Smoothie

Valentine's Day is around the corner, and what is more apt to share than something that visually resonates with such a romantic day!  There is nothing much to write about a smoothie, other than it is both visually and gastronomically satisfying.  It's not a drink, it's not an ice-cream, and yet it is all those things wrapped into one.  Don't forget it can be nutritious for you too! Wonderful! Yep! That's what it is! 
Raspberry Smoothie


I absolutely love this pink color!  Okay, it may not be so appealing on a wintry day, but somewhere on the other side of the globe this is still welcomed, I am sure. It is definitely reminiscent of a hot, sultry Sunday afternoon, when you can lounge on you chair, in the veranda, sipping your smoothie which will fan you cool.  Melting ice-creamy moments! 

Raspberry Smoothie


But in winter, when you want to try this, and have a toddler in the premise, you have to sneak it!  If he gets hold of it, then proceed days of sore throat, and we-cannot-talk-about-it kind of issues to deal with.  But, if you are a raspberry lover like me, I can give you all kinds of ways to sneak around the kids and enjoy it.  Drop me an email, I will be glad to enlighten you ;)  I know this sounds like marketing but hey, sometimes what else is Valentine’s Day too? For raspberry lovers, it's not about seasons - these drinks can be so addictive they will be a way of life. Like for people in love, it does not matter if Valentines Day maybe a commercial gimmick, it’s a celebration of love!

Raspberry Smoothie

We also wish to say Happy Birthday to Sybil, who has diligently read through our posts and pointed out glaring mistakes.  Continue to blame Namitha and Sunitha for grammar and syntax mistakes, because they are only when we have not headed her advice :) Thank you Sybil, Collaborative Curry wishes you a very Happy Birthday and fantastic year ahead!
 
Ingredients:

Fresh Raspberries- 1 cup
Milk- 1 cup
Yogurt preferably Berry - 1/2 cup
Sugar- to taste
Ice cubes

Method:

1.Mix everything together in a blender and serve.

Contributor: Namitha

Tuesday, November 16, 2010

Chocolate Swiss Roll

Do you remember jam rolls? I remember them from my childhood – they were a lovely yellow with a bright, red filling inside! The color and its effect on you are so strong that you could never leave the bakery without at least half-dozen tucked away in those infamous brown, bakery bags. Writing this much brings a plethora of other baked goods to mind. I used to especially love the horn pastry with snow-white cream filling embellished with a ruby-colored cherry! They resemble an ice-cream cone. Yumm! Just day dreaming about these sweets gives me a sugar high.

Moving on to what we are going to share with you today, although different from the jam rolls that are making my mouth water right now, these sweet rolls are delectable nonetheless! I have been practicing these rolls, and after a couple of mishaps, I feel confident enough to share with you now.

Chocolate Swiss Roll

Sneak peek into the process.

  Chocolate Swiss Roll

This was the second time I made this and the roll disappeared in no time.(at the first time I couldn't even take a picture ! )

Chocolate Swiss Roll

Ingredients:

Eggs- 3 large, separated
Granulated Sugar- 1/2 cup
Cake flour- 1/2 cup
Baking powder- 1/2 tsp
Salt- a pinch
Cocoa Powder- 1 1/2 Tbsp
Hot water- 2 Tbsp
Pure Vanilla extract- 1/2 tsp

For the filling:

Heavy whipping cream- 1 cup
Confectioner's sugar- 1 to 2 Tbsp
Pure vanilla extract- a few drops

Method:

1.Preheat the oven at 350 degree F. Grease and dust a jelly roll pan. (this recipe is for 10 1/2 by 15 1/2 inch pan). It's better to line with a parchment paper and grease it well.You could see that I didn't do it, so it was bit difficult for me to take out the cake.
2.Whisk together the flour, baking powder and salt in a mixing bowl.
3.Beat the yolks with sugar. Add the hot water and beat again.
4.Add the cocoa and mix well.
5.Beat the egg whites till stiff peaks are formed.Make sure that your blades and the bowl you take is free from water and fat before you start beating egg whites.
6.Mix in the flour mixture into the yolk mixture.
7.Gently fold in the egg whites till it is completely incorporated.
8.Spoon into the prepared pan and spread the batter evenly as possible, using a spatula.
9.Bake for 8-10 minutes or the cake springs back on touch.
10. Cool in the pan for 3-4 minutes.
11.Invert the cake onto a parchment paper dusted with confectioner's sugar.
12.Roll the cake with the short side facing you, along with the paper.
13.Let the cake cool completely before you roll it with the filling.
14.Meanwhile you could make the filling by whipping the cream till peaks are formed.Add the sugar and vanilla and beat till everything is mixed well.
15.Unroll the cake and spread the cream on it, evenly.Leave about 1/2 an inch space at one end.(I messed up this part. I left some space , but I was talking to my son and started rolling it from the other side !)
16.Now roll it without the parchment paper, but use the paper to make the roll by lifting it from the side slowly as you can see in the picture.
17.Refrigerate the roll for at least 3-4 hours before you cut it.
18.Use a sharp serrated knife or kitchen thread to cut the rolls.(I wasn't patient enough to wait,read my kids weren't, that's why it has broken in some points !)

Notes:

1.You may not get it all right at the first attempt, or even at second :-) But I can guarantee you about the taste and texture.
2.The main point you have to remember while making rolls is that you must roll it while it is still hot. This helps to avoid any breaking.
3.As you all know, chocolate is notoriously sticky. So if you use a parchment paper to line the pan it is lot more easy.
4.Please wait at least for a few hours so that the cake is chiled well before you attempt to cut it.

Contributor: Namitha
Recipe adapted from here

Friday, September 24, 2010

Moist Chocolate Cake

This is one cake you can whip up with your eyes closed. Even then, the texture and taste is the kind to die for.

Sunitha first found this recipe online, and since then, both of us have made it several times. Believe us, it can never go wrong! This surely is one of those recipes that lives up to the remark ‘fool proof.’

Moist Chocolate Cake

In short, this comes highly recommended by Collaborative Curry! Let me tell you, if you have nothing better to do, get this one going. You will have everyone going Ga! Ga! over it.

Moist Chocolate Cake

This will show you how it looked when I took it out from the oven.

Moist Chocolate Cake

Yes, use Hershey's cocoa, its really good!

Ingredients:

For Cake:

Flour- 1 cup
Sugar- 1 cup
Cocoa powder- 1/3 cup
Baking soda- 1 tsp
Egg- 1
Salted Butter/Oil- 1/2 cup
Buttermilk/Milk- 1/2 cup
Pure Vanilla extract- 1 tsp
Boiling water- 1/2 cup

For Frosting:

Whipped Cream Frosting.See here
OR
Use store bought Whipped cream

Method:

1.Preheat the oven at 300 degree F.Grease a 7 by 11 inch baking dish with butter/shortening.
2.Mix the flour and baking soda by whisking together in a mixing bowl.
3..Beat the sugar and butter/oil. Add the egg and beat well.
4.Add the milk/buttermilk and cocoa and mix everything well.
5.Add the boiling water and vanilla extract now.
6.Finally add the flour mixture and mix everything well.
7.Pour it into the baking dish and bake for about 30-35 minutes or till the cake is done.
8.Cool on a wire rack and do the frosting.

Moist Chocolate Cake

Notes:

1.If you are using unsalted butter, you may add 1/4 tsp salt.
2.Both oil and butter works fine, though butter is better.
3.This tastes superb even without frosting.Just like Lyndsey mentioned in her comment, you could dust it with powdered sugar.

Recipe from here

Hope you guys have a fantastic weekend.

You can find our Mahogany cake recipe here

You can find all our cake recipes here

Contributor:Namitha

Tuesday, September 21, 2010

Chocolate Sugar Cookies

Chocolaty cookies with frosting that mirror my flower garden!

  Birthdays were the happiest occasions when I was young. (Between you and me, now they remind me that I'm not too far from wrinkles and white hair).  When in school, birthdays were the one day we could wear casual clothes to school, a change from the regular uniform.  I used to wait eagerly for my birthday to roll in to  show off my color dress (that's what we called casual clothes then) and distribute candy.  How things have changed now!

 For an example, when my daughter celebrated her birthday last week, it was different.   She wears casual clothes to school everyday, so then, how do you make it special?  She had an answer!  Dress up chocolate cookies, her favorite, for the occasion.  I am glad we decided to go with her instinct because the sugar cookies with frosting came out vibrant and festive.   

 To add to all that, since both my children helped to make the different shapes and frosting, it became a family event.  We had quite a good time in spite of all the spilling and mopping that comes with the territory of group activity.  It was with great restraint that we were all able to keep ourselves from licking. 

Which do you like the most? It's hard to choose, I know.

Chocolate Sugar Cookies

My daughter would say the one with purple icing, since that's her favorite color.  I am partial to this one too, because it is my own creation.  I added blue and red in 2:1 proportion to get the desired result.    When you are trying keep adding more red if you think you need to soften the blue further.     
Chocolate Sugar Cookies


Did you notice the sprinkles are little butterflies? Oh, yeah! They are, and it made my daughter's heart flutter with excitement and squeal with delight, every time we sprinkled some on. Childhood, such a delightful time!

Ingredients:

For Cookies:

All purpose Flour- 2 3/4 cup
Cocoa powder (preferably Dutch processed)- 3/4 cup
Baking Powder- 1 tsp
Salted Butter- 1/2 cup
Unsalted Butter- 1/2 cup
Granulated white sugar- 1 1/2 cup
Eggs- 2
Pure vanilla extract- 2 tsp

For Icing :

See here
But if you are making the above amount of cookies you may have to make double the amount for icing, but the proportions are the same.

Chocolate Sugar Cookies

Method:

1.Mix the flour,cocoa powder and baking powder by whisking together them in a large mixing bowl.
2.Beat the butter and sugar well in a bowl,until smooth and soft.
3.Add the eggs one at a time and beat well.
4.Pour the vanilla extract and mix well.
5.Mix the wet and dry ingredients to make a dough.
6.Divide the dough into 2 or 4 equal parts and make disc shape and wrap them in plastic and refrigerate for at least 30 minutes or until they are firm enough to roll.
7.Preheat the oven at 350 degree F and line 2 baking sheets with parchment paper.
8.When the dough is ready, take one disc from the fridge and roll it on a flat surface until it is about 1/4 inch thick and cut it with a cookie cutter to get your favorite shapes.
9.Transfer the cookies to the prepared baking sheets and chill them for at least 15 minutes. This helps the cookies to retain their shape while baking.
10.Bake them for 10-12 minutes and cool on a wire rac before you do the frosting.
11.Meanwhile prepare the next batch of cookies and chill them before baking.
12.Prepare the frosting by mixing everything together and spoon it on the cookies. Let it dry,this may take several hours. Store them in an airtight container.

Chocolate Sugar Cookies

Sending this to From My home Kitchen's Chocolaty Dreams event
AND
Champa's Bake Off event

Notes:

1. Butter should be at room Temperature.
2.You could use the normal cocoa powder, if you don't have Dutch processed.I used a mixture of both :-)
3.According to the original recipe, Royal Icing is recommended. But I didin't have any Meringue powder at home and didn't want to take any Salmonella risk, by using the raw egg whites.
4. Makes around 4 dozen.

Recipe Adapted From: Joy of Baking

Contributor: Namitha

Tuesday, March 2, 2010

Brownies

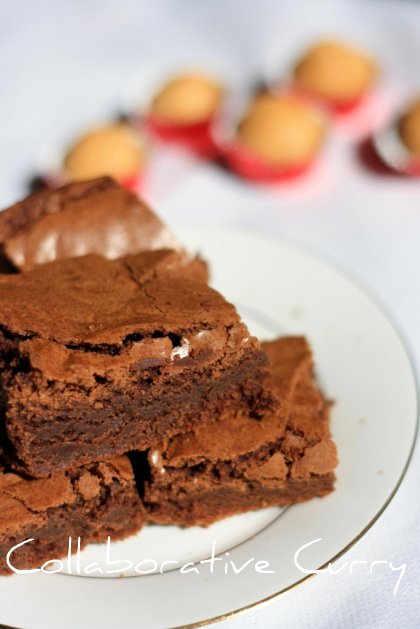
There are hundreds of brownie recipes in the blogosphere. I am sure you have your own way of doing it too. After a lot of permutations and combinations I have come up with my own recipe that works like a charm. My children love it and so do my DH and me. This brownie with a dollop of vanilla ice cream makes a perfect dessert.


 I hope you are doing well wherever you are.  Its time for me to come around and see what you have been up to now and drool over some of your recipes. Let me also say how glad we at Collaborative Curry are that you visit us and tell us about how much you like our recipes and photos. Hoping you will have fun treating yourself and your family to some delicious brownie I will sign off for today.


Ingredients:

Flour- 1 cup
Baking powder- 1/2 tsp
Salt- a pinch
Granulated sugar- 1 1/3 cup
Butter- 1 cup
Eggs- 3
Pure vanilla extract- 11/2 tsp
Cocoa powder- 1/2 cup
Chocolate chips- 2/3 cup(optional)

Method:

1.Preheat the oven at 350 degree F.Sift the flour, salt and baking powder together.
2.Beat the butter and sugar until soft and smooth.
3.Add the eggs one by one and beat well to incorporate.
4.Beat in the vanilla extract and the cocoa powder
5.Fold into the flour mixture alternately with the chocolate chips, if you are adding any.
6.Transfer into the greased 9 inch cake pan and bake for 35-40 minutes or till a skewer inserted comes out clean.
7.Cool it for a few minutes and transfer onto a wire rack and cool completely.
8.Serve with vanilla ice cream or any ice cream of your choice.


Notes:

1.I have baked it with 1 more egg, and it will give a more cakey texture.
2.Adding chocolate chips will give a mosaic gooey texture and my family love it :-)
3.You could replace the chocolate chips with nuts of your choice if you want it to be nutty .
4.This recipe will give you brownies with a crumbly top, as you can see in the picture.

Contributor: Namitha

Wednesday, February 17, 2010

Sugar Cookies

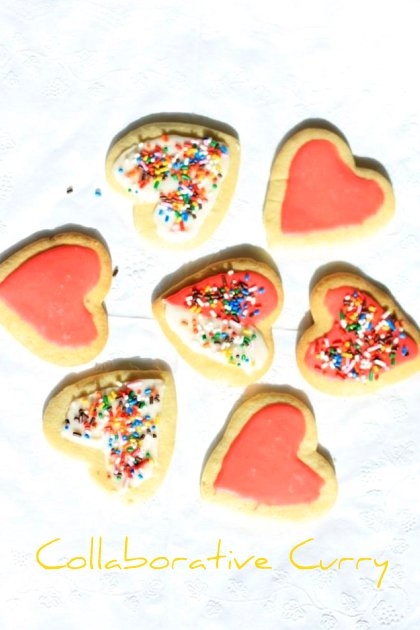
   Visiting your blogs confirmed to me that most everyone had a good time on Valentines Day. This is very good and I want to report I had a good one too. Maybe my children enjoyed it a tad bit more, what with the funky colorful cookies and all, but I had a good time making it, seeing their excitement, which in turn pleases my DH quite a bit. Now you can see how one thing led to the other setting a ripple of joy.
   My daughter had been hounding me to make cookies. Like most mothers, I give in when I see passionate persuasion. She was bursting with ideas of how she will decorate it and what color to use and I have to say, I am quite pleased with the results myself. Don’t children amaze you with the clarity of their thinking? I sometimes wish I knew as clearly about what I want like my kids. I am pretty strong willed mind you but my daughter beats me hands down.
  She absolutely loved the icing and the cookies. My toddler son also enjoyed them, though he doesn't have a clue about Valentine's Day. I am thinking it’s the color and sprinkles on the icing but either ways he was jumping as excitedly at the whole affair as his sister.  Now it’s your turn, make some colorful spunky cookies and let’s beat this post Valentine’s Day blues. Let the party begin!


Ingredients:
For Cookies:

Flour- 1 1/2 cup
Baking soda- 1/4 tsp
Baking Powder- 1/4 tsp
Salt- a pinch
Unsalted Butter- 1/2 cup
Granulated sugar -1/3 to 1/2 cup
Egg- 1
Pure Vanilla Extract- 1 tsp

For Icing:

Confectioner's sugar- 1 1/3 cup
Light corn syrup(Karo)- 2 Tbsp
Milk- 1 Tbsp
Vanilla extract- a few drops
Food color


Method:

1.Combine the flour, Baking soda, baking powder and salt well, by sifting.
2.Beat the butter and sugar until soft and smooth.
3.Beat in the egg till it is incorporated well.
4.Pour in the vanilla extract and beat in to mix.
5.Mix the dry and wet ingredients together and flatten the dough to form a disc and keep chilled for at least 30 minutes.
6.Preheat the oven at 350 degree F and line 2 baking trays with parchment paper.
7.Take out the dough from the refrigerator and roll it out on a floured surface.
8.It should be about 1/4 inch thick.
9.Cut the rolled dough using a cookie cutter and lay on the baking tray.
10. Keep this in the refrigerator again for 5-10 minutes and bake for 10-12 minutes or until the sides start turning golden brown.
11.Cool them on a wire rack.
12.For the icing,combine all the ingredients well. If the mixture is too thick add little more corn syrup and a few drops of milk.
13.Spread this on the cookie and let it dry. (this may take a couple of hours, depending on the amount of water content).


Sending this off to Priya's Hearts for St.Valentine's event.