Friday, April 30, 2010

Achinga Payar Mezhukkupuratti / Yard long Bean stir fried with Thai Chili

   Famously know as the yard long bean these are actually only about 1/2 a yard long.  From the cowpea family this is quite common and universally liked in Kerala.  I think we accept it more as our own.  Even when we hesitate to add green beans to some of the traditional preparations, yard long bean or snake bean or Chinese long bean is considered more 'apna.' (hindi word to express a possessive own).

  Like we treat most vegetables in our cuisine we sauteed this beans.  It's safe to say it's universally preferred.  The only flavors we give this dish comes from the coconut oil, coconut pieces and sometimes onions.  The difference of chilis used either green or dry red chili also alters the flavor slightly.  I made some this morning in the most simple way and I we will elaborate on a few more ways of sauteing this vegetable in later posts.    Hope you enjoy this simple dish.  Have a fantastic weekend with the weather ever so beautiful outside. 
Ingredients:
Beans - 1/2 a bunch (about 30)
Thai chili - 6 nos
Oil - 2 Tbspn
Salt - to taste

Method:
1. Snap the beans to small pieces and split the chilies at the ends
2. Heat oil in a pan add the beans stirring intermittently on medium heat saute the beans
3. When half done add salt to taste and stir
4. Cook till done and serve with rice and curry
Contributor: Sunitha

Thursday, April 29, 2010

Strawberry Banana Nut Bread

Everyone in the family loves muffins; strawberry or banana muffins tops the list. Therefore, muffins have become a regular in this household.  Seeing that these two flavors are a hit and having some of both to spare, my mind went into overdrive.  I wondered what if I combine the two.  Ok, secret only for you: I had only a little of both but together they would just be the right amount to bake a loaf.  I gleaned the web and used some stored memory in my gray cells, and what do you know, I baked some delicious combination bread.  Try it to see the flavors blend in marvelously.

  Digressing from cooking, I wanted to tell you how spring has been treating me.  These days I am out in the yard either in the pretext of educating my son or mowing the grass or something else.  Whatever the excuse I make it a point to be out a couple of times.  Guess what fantastic sights I have been enjoying.  The other day I was out and about and lo and behold I spotted this sparrow working away within the pine tree.  I craned my neck a little and confirmed my doubts.  It was making it's nest!  Oh! the thrill of it.  I sneaked in and got my camera and clicked away.  Hmm... it was something else! I have updated a picture on facebook and if you would like a peek its here.  


Ingredients:

Strawberries (hulled and chopped)- 1 cup
Banana mashed -1 cup (~2 numbers)
Walnut (chopped coarsely)- 1/2 cup
Flour- 1 3/4 cup
Oats- 1/2 cup
Cinnamon- 1 tsp
Nutmeg powder- 1/8 tsp
Salt- 1/8 tsp
Baking powder- 1 tsp
Baking soda- 1 tsp
Butter/ oil- 1/2 cup
Eggs- 2
White granulated Sugar-3/4 cup


Method:

1.Preheat the oven at 350 degree F.Grease a loaf pan (9 by 5)
2.Whisk together the dry ingredients except sugar in a mixing bowl.
3.Beat the butter/oil and sugar until soft.
4.Add the eggs one by one and beat well to mix in.Also add the mashed bananas in and beat well.
5.Throw in the strawberry pieces into the flour mixture and toss well to coat the pieces.
6.Fold in the wet mixture into the dry one along with the chopped nuts.
7.Transfer to the loaf pan and bake for 45- 50 minutes or until a skewer inserted comes out clean.

Notes:

1.I have tried both with butter and oil and both works fine.
2.If you wish you could add a little more fruit.
3.I read that this tastes best if you cut the loaf after 24 hours.I was never able to do it,though I had a couple of slices left on the second day and sure that tasted better.
4.If any of you happen to make this and let the loaf ripen before you cut, do let me know :-)


Contributor: Namitha

Wednesday, April 28, 2010

Szechuan Chicken

   Photographing Chinese food is a joy.  Their color on black or white background is stunning.  My love for this food though goes beyond photography.  I am addicted to Chinese food.  Addiction can sometimes lead people in the positive.  I started experimenting with Chinese food a long time back.  I always have soya sauce and oyster sauce at my disposal.  A very sharp chili sauce which I found after coming to the US has  become indispensable now.  Today's recipe uses soya sauce and vinegar for sure but otherwise the flavors are more from the garlic, dry red chili and sesame oil making it piquant and I loved this variation.   It's a brave move to name this dish Szechuan because I am unable to vouch for authenticity.  However, after chasing the internet for some history I found that Szechuan cuisine originated in Sichuan Province in China and the cuisine used Sichuan pepper which makes all the difference.  I used regular chilies from the Indian store and hence this is probably more of a Indian Szechuan Chicken.  The only other reason I braved this move in naming it so is the liberal use of sesame oil, a generous amount of ginger and garlic.  Either ways it is tasty.  I know you have only my word to go by but try it for sure you will not be disappointed.

Ingredients:
1. Chicken Breast      - 2
2. Ginger                   - 1 Tbspn
3. Garlic                    - 2 Tbspn
4. Onions                  - 1/2 of medium
5. Cabbage               - a small wedge
6. Carrot                   - 1
7. Bell Pepper           - 1
8. Pepper                  - 1 tspn
9. Dry Red Pepper    - 10 nos
10. Tomato Ketchup - 1/2 Tbspn
11. Soya Bean          - 4 Tbspn
12. Scallions (spring onions) = 2 for garnishing
13. Rice Vinegar      - 1 Tbspn (most recipes for Schezwan I have seen Sherry being used.  I din't have any so used rice vinegar and I know this is not a preferred substitute.  Please use dry sherry if you have)
14. Sesame Oil         - 3 Tbspn (The taste is quite sharp, use canola oil and just a little sesame oil if you are not used to or like the taste of sesame oil.  The sesame taste is distinct and gives the dish a feel as if from a restaurant)

Method:
1. Marinate chicken with salt and pepper for at least 1/2 hour
2. Heat some oil in a wok and saute the thinly sliced chicken till the pink flesh turns white and its cooked through and keep aside
3. Add some more oil into the wok followed by chopped onions and saute for a couple of minutes
4. Tip in the chopped ginger and garlic in this order and saute
5. Add julienne carrots, cabbage and bell pepper sauteing after each addition
6. Add a tablespoon of rice vingegar, 2 tbspn soya bean sauce and check for salt and if needed
7. Move this off into another dish.
8. In the same wok add either 1 1/2 cups of chicken stock or water and let it boil
9. Add 1 Tbspn of corn starch into 1/2 cup of water and stir to dissolve
10. Pour this and 1 Tbspn ketchup and 2 Tbspn or soya bean sauce, thicken
11. Tip in the chicken and vegetables and stir in and serve hot over rice or cooked noodles

Notes:
1. When making chinese food I prefer having all the ingredients chopped and kept ready before the wok is heated
2. On medium high or high flame the ingredients and dropped in and cooked quickly
3. Make sure your chicken is cooked well
4. Szechuan cuisine uses star anise and brown sugar and you may use one of star anise when you start frying the onions and 1 tspn of brown sugar when you make the sauce
5. Since I did not want the sweetness and still have a little to bring the flavors together I used 1 Tbspn of ketchup.

Contributor: Sunitha

Tuesday, April 27, 2010

Mampazha Pulissery/Mango in yogurt coconut gravy

          Mangoes conjure images of a sultry afternoon in India and in the same vein rushes in the image of juicy ambrosial mangoes. In India, the first mangoes of the season appearing in markets are usually from Kerala.  When most states harvest mangoes around June March and April is when the fruits are ripe in Kerala.  This is important to mention here because these months also mark the end of an academic year.  Now you see where I am going with this?  Well, summer holidays rolls in and so does the season of mangoes.  When you put the two together it all locks up and pleasant childhood memories resurface.  Playing with siblings and cousins in our grandparents home, stoning down mangoes from the tree, walking through the yard picking kanni manga etc were all pass times greatly enjoyed.  Lunch time comes and we would be fed some savory dishes made out of mango and when I look back realize mangoes are indeed a integral part of our culture.  With an abundance of it in our state I am not in any doubt as to how someone might have found a way to make a savory dish out of it.  All kinds of things like pickling mangoes when they are raw, drying and powdering them, when ripe drying and eating it as a candy or making a thick shake and drinking it up and finally a savory dish to go with our staple diet rice. Without further ado just want to say mangoes are special as much as they are tasty.  I hope you enjoy this delicious dish and let me know what you think.  You have a nice day.


Ingredients:

Ripe Mango- 1
Yogurt- 1 Cup
Coconut grated - 3 Tbsp
Cumin seeds - 1/4 tsp
Green chillies- 2
Red chilli powder- a pinch
Turmeric powder- 1/4 tsp
Salt

For seasoning:

Mustard seeds- 1/4 tsp
Fenugrek seeds- 1/4 tsp
Red chillies- 2
Curry leaves -a sprig

Method:

1.Peel and cube the mango and cook them in enough water to immerse them completely after adding turmeric,green chillies,red chilli powder and salt.Cook for 10-12 minutes.
2.Grind the coconut and cumin seeds together to a fine paste.
3.Mix this paste in the cooked mango mix and cook covered for another 3-4 minutes.
4.Meanwhile blend the curd or yogurt using a whisk or hand mixer.
5.Add this into the mixture slowly while stirring with one hand.Adjust the consistency using water.
6.Stir continuously,and when you see the steam starts coming switch off the heat and pour into the serving dish.(This shouldn't take more than 3-4 minutes.If you keep longer it will get curdled)
7.Heat oil in a pan and do the seasoning.(when mustard seeds splutter, add fenugreek seeds, wait for that to splutter and reduce the heat, add red chillies and curry leaves)
8.Pour this seasoning over the pulissery and serve with Rice.


Contributor: Namitha

Monday, April 26, 2010

Lemon and Chili

  I learned to make this pickle from my sister-in-law.  She is quite wary when it comes to Indian cooking but  excellent with her casseroles, cakes and cookies.  She is going to be aghast when she reads this post today, someone posting a recipe of hers is going to ball her over.  This one is for you Sy.  Thank you. I loved the pickle and V has been asking for more.

  My husband so loves this pickle he has started this new thing.  Collecting lime rind after making lemonade to pickle them. Now how this pans out is yet to be seen.  Will tell you all about it once my husband figures out a way to replicate the taste of this pickle with the lemon rind..  As for now please enjoy the real deal all the way from Texas.  Enjoy y'all!

Ingredients:
Lemon - 5
Chili - 10 nos
Garlic - 5 - 6 pods
Mustard - 1/4 tspn
Vinegar - 1/4 cup
Asafoetida - a pinch
Methi Powder - a pinch (optional)

Method:
1. Place the lemons in enough water and bring to a boil
2. Make sure they don't break but has changed color slightly like its blanched
3. Cool and cut them into 8 pieces
4. Heat sesame oil in a pan and splutter mustard.
5. Add garlic, curry leaves and saute
6. Switching the heat off season this further with a pinch of asafoetida and methi powder
7. When the tempering is cool add cut lemons and vinegar, mix well.  Make sure you have salted the pickle well
8. Over time the lime will absorb the salt so its imperative the pickle is a tad over salty when you bottle
9. Keep the pickle in an air tight glass bottle for at least 10-15 days for it to set and ingredients to blend well well
10. You can check for salt after 5 days of bottling to make sure it is enough

An easy preparation to help perk up an otherwise boring rice and curd meal

Contributor: Sunitha

Sunday, April 25, 2010

Strawberry Jam/Preserve

I love butter and jam on my toast.  In America peanut butter and jelly on bread is common.  When I talk butter and jam it's kind of close you will agree.  Anyways, strawberry as you might have already guessed is my favorite. In case I have a few strawberries left over which is not often and it starts losing it's color and everyone goes cool on it I save it by making a jam.  Nifty, you will agree.  The recipe is simple and easy to make and I am sure you will enjoy it.  Get some fresh strawberry from the store, those are the best to make some of this scrummy delight.  But like me if you have left overs ,clean them ,take the good portion for the jam.


Ingredients:

Strawberries- 1lb
Sugar- 1 1/2 cup/to your liking
Lemon juice- 1 1/2-2 Tbsp

Method:

1.Clean ,hull and mash the strawberries.If you want to have chunky jam/preserve do not mash much.
2.Throw in all the ingredients in a thick bottom ,deep pan and keep the heat on medium low and mix well to dissolve the sugar.
3.Stir continuously and increase the temperature and let it boil.Be very careful, once it starts boiling the syrup will start spluttering.So it's wise to use a bigger pan and longer spatula.
4.Switch off the heat once the water is almost absorbed ,but not completely and transfer to sterilized jars.If you are going to have it soon,and not going to seal the jars like me, refrigerate it.


Notes:

1.Do not fill the jars full,as I've done,if you are storing for a long time :-)
2.You have to decide the amount of sugar according to the sweetness/sourness of the fruit.
3.This is a pectin free preparation as you can see,which is quite simple yet very tasty.
4.I didn't have any sterilized jars and I'm not going to store it longer.Half of it is already gone :-)
5.I have referred many sources to see how to check whether it's boiled enough if you do not have a candy thermometer(it's 220 degree F on candy thermometer)and here is one : Dip a spoon in jam and slide it.If the jam drops down as a sheet/run together then it's done.

Contributor:Namitha

Thursday, April 22, 2010

Chicken in a Blanket

  I am sure you will all agree it's a good idea to save for a rainy day.  Now, today's recipe is one like that.  I bungled up big time.  I am way off with photographing and even though I made some nice sauteed broccoli I  never got around to taking a picture.  However, these old pictures I had with me will save my day.  Its chicken marinated in garlic powder, salt, paparika and oregano wrapped in cooked cabbage leaf.  The name for the dish is probably a misnomer.  I got the idea of doing this dish after I read about pig in the blanket.  One of the reasons for keeping this recipe away for so long was in the hope that I will make pig in the blanket first and then as a variation talk about this one.  Well, some of our bad time management skills catches up with us and good intentions have to be sacrificed.

Ingredients:
Chicken Breast - 2
Garlic powder - 1/2 tspn (you could sprinkle some if you do not care for too much of a garlicky taste)
Oregano - 1/2 tspn (again it's optional add as much or little.)
Olive oil - 2 tspn
Salt - to taste
Cabbage leaves 6

Method:
1. Boil water with salt in a fairly large pan to immerse cabbage leaf without breaking it.
2. Cook for just a few minutes until you feel they are pliable and you can work with them to wrap meat in
3. Marinate chicken for an hour
4. Heat olive oil in a pan and cook chicken till done
5. Cut the chicken into small pieces and add jalepeno, pickled or fresh shallots finely chopped
6. Place the meat on one edge and carefully wrap it
7. It's ok if it breaks you can add a piece of chicken on top of your wrap and tightly secure it with a tooth pick

Enjoy as a snack

Contributor: Sunitha

Wednesday, April 21, 2010

Bittergourd/Pavakka Kichadi

I always get confused between kichadi and pachadi. The only difference I could find is that, for kichadi, you have to fry the veggies and for pachadi, you have to cook them adding water. If any of you know other reasons for calling them by different names do let us know.  These are all simple dishes that goes on our tables everyday and since we have been on a effort to cover exhaustive everyday meals at home here is another one.


Ingredients:

Bitter Gourd- 1
Green chillies- 1 or 2
Coconut Grated- 3Tbsp
Cumin seeds- 1/4 tsp
Mustard seeds- 1/4 tsp
Yogurt- 1/4 cup
Oil-for frying

For seasoning:

Coconut oil- 1Tbsp
Mustard seeds- 1/4 tsp
Red chillies -2
Curry leaves- a sprig

Method:

1.Chop the bittergourd and green chillies thin and fine.
2.Heat oil for frying and fry the bitter gourd and chillies till they become crisp, but not overdone.Keep this aside
3.Grind the coconut and cumin together to a fine paste.Crush the mustard seeds.
4.Heat oil in a pan and do the seasoning.Add the coconut mixture and crushed mustards and saute till all the water is absorbed.
5.Take the fried bittergourd in a mixing bowl and crush them a bit.To this add the sauteed coconut mix and yogurt and mix well.


Notes:

I used Japanese Bitter melon for this. As I have mentioned in the Bitter gourd fry post, it's less bitter than the dark green variety.There were many requests for a picture of that and here it is :-)

Tuesday, April 20, 2010

Ari Payasam/Rice kheer with Brown Sugar

I have never made ari payasam before.  Last week during one of my conversation with Nami about sadya  the topic of payasam came about,  You know what a lot of talk about food can do.  Craving.  Yes, big time.   She had not posted her delicious payasam at that time so I had her on the phone and insisted she help me through the process.  She did and it came out quite well.  I am definitely happy to have been part of the whole Vishu deal this year.  I used brown sugar instead of jaggery hence the different color.  However, the taste was quite close.  Either ways,  if you feel like having some payasam and don't have all the traditional ingredients please feel free to try this recipe. 
Ingredients:
Basmati Rice -1/2 cup
Brown Sugar-1/3 cup/to your liking
Jeera(cumin) powder- 1/8 tsp
Cardamom powder- 2
Coconut Milk(canned)- 3/4 + 1/4 cup
Ghee (Clarified Butter)- 1 1/2 Tbsp

Method:

1.It's the same like we have explained here, except that you need to cook only rice for this recipe.
2.Once the rice is cooked add the ghee and the brown sugar and stir continuously till you get the one thread consistency. I found that brown sugar takes less time compared to jaggery.
3.Then add the diluted coconut milk (add 3/4 cup and 1 1/2 cup water to get this) while keeping on high heat and stirring and let the mixture boil well.
4.Switch off the heat and add the coconut milk with spice powders mixed and mix well.
5.Fry the cashews and raisins in ghee and garnish.


Contributor: Sunitha

Monday, April 19, 2010

Biscuit pudding ?

   I am not sure what to call today's recipe.  A recipe I am revisiting after almost 8 years ! I got the basic recipe from the cocoa powder packet when I was still newly married. I made it often then and friends and family equally liked it.  Recently, I had a craving for some and made it for you and me.  I hope you will enjoy it as much as I do.  Also, let me know if you can think of any other name for this pudding and leave your suggestion in the comments.  I will update the name with the most innovative and apt suggestion.


Ingredients:

Marie biscuits- 25
Milk- 1 cup
corn starch- 2 tsp
cocoa powder- 2 tbsp
sugar- 2-3 tbsp


Method:

1.In 2-3 tbsp of milk, mix the cocoa powder and corn flour without any lumps and keep aside.
2.Boil the remaining milk in a pan.
3.Add the sugar and stir to mix in well.
4.Add the cocoa corn starch mixture to this while stirring and continue stirring the entire mixture till it starts thickening.
5.When you see that it has thickened enough switch off the heat. (it shoul be little more thicker than dosa batter at this point)
6.Place one biscuit in a plate and pout a tbsp of mixture on top.
7.Place the next biscuit on top and continue for 5-6 more biscuits. Finally pour on the sides to fill any gaps.
8.Make 3 more piles like this.
9.Let it come to the room temperature and keep in a refrigerator for 1-2 hrs.
10.Serve chilled, after slicing the block.


Contributor: Namitha

Friday, April 16, 2010

Rice &Greengram Payasam

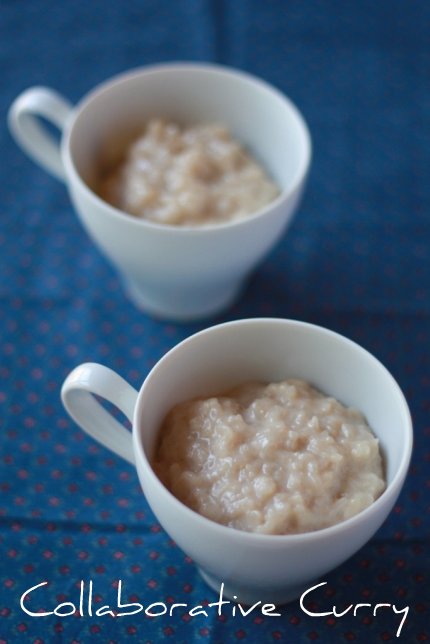
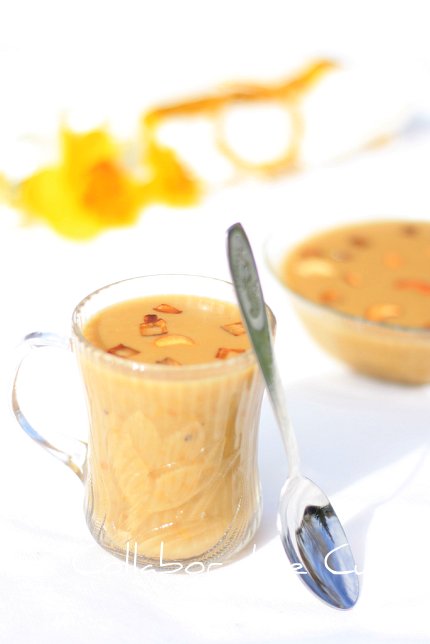
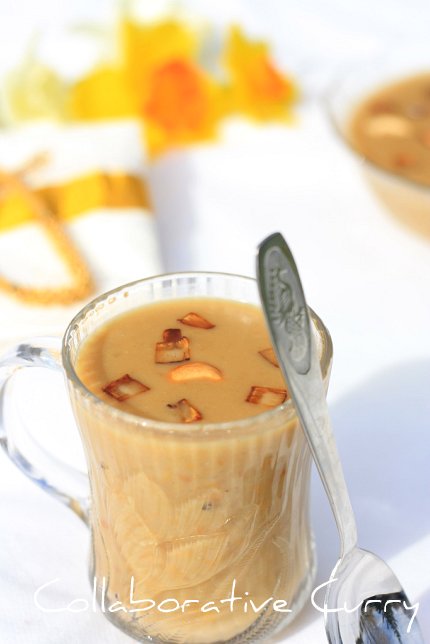
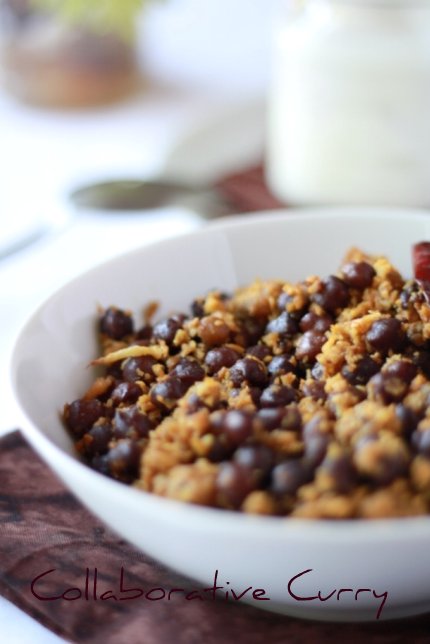
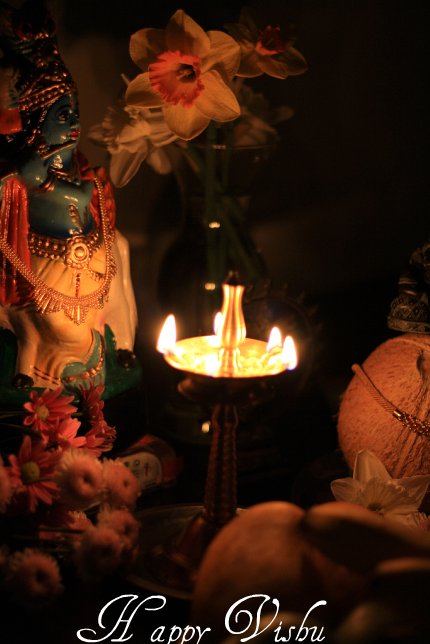
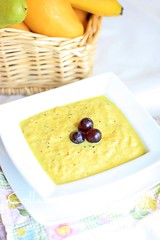
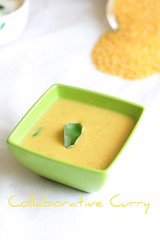
Hello there! We hope you all had a blessed Vishu.  It was kind of you to leave your good wishes and as always I enjoyed reading them all.  Today I am sharing the recipe for payasam (a dessert) which is served in Sadyas.  I was confused and undecided about which payasam to make this Vishu.  If I ask for suggestions to my husband and kids I will have as many different requests.  You will agree in this scenario it's best to make something everyone enjoys, as well as memorable of some great Vishus celebrated with family back home (India).

  When it comes to payasam my father is the guru.  He is a master at it and makes various kinds.  Recently, for a family function all the men decided to get together and under his guidance make payasam, for a party of around 400.  I mean, my dad is no Chef.  His profession was with the education board and at this age to take up a challenge like this?  I am sure my mom was anxious and fretted till the whole thing was over but from the reviews I have heard it was a success.   When I talk about payasam and discuss recipe with my dad and sister they are all information about how to go about it.  I am not as good as my dad but the recipe you can believe is coming from the right hands.  Tried and tested a million times you will not be disappointed. Enjoy a sweet treat and wish you have a pleasant weekend.


Ingredients:

Rice (preferably Red)- 2/3 cup
Moongdaal/cherupayar parippu (dry roasted)- 1/3 cup
Coconut Milk(canned)- 1 cup+ 1/4 cup (see the notes if you are using fresh coconut milk)
Jaggery (melted)- 2cups/to your taste
Ghee- 2 Tbsp+ 1Tbsp
Cardamom powder- 1/4 tsp
Cumin Powder- 1/2 tsp
Ginger Powder- 1 tsp
Raisins- 1tbsp
Cashews(raw)- 2 Tbsp
Coconut slices(preferably copra)- 2 Tbsp


Method:

1.Dry roast the moong daal till it turns slight golden brown and let it cool by spreading on a paper.
2.Wash and drain the rice and keep aside.
3.In a thick bottom pan cook the roasted daal after adding 3-4 cups water.Once it starts boiling, reduce the heat and allow to cook till it is half done. This took me about 11 minutes.The time varies depending on how much you have roasted it.
4.Now add the rice and boil again .Reduce the heat and let it cook completely.
5.The trick is to get both the daal and rice done at the end, without overcooking any.
6.This took me around 16-17 minutes.Stir carefully in between. If you think water is less add a little more and boil before reducing the heat.
7.The water should be a little bit on the higher side, compared to cooking rice for fried rice or for lunch.
8.Meanwhile keep the coconut milk ready.If you are using canned one, take 1 cup and add 2 cups of water in it and mix well.
9.In the remaining 1/4 cup coconut milk add the spice powders and mix well, so that there won't be any lumps.
10.Once the daal and rice is cooked add 2Tbsp of ghee and melted jaggery into it and stir well.
11.Once it starts boiling the mixture will start splattering, so be careful, and don't forget to reduce the heat while stirring continuously.
12.You have to continue stirring till it gets one thread consistency.
13.At this point slowly add the coconut milk water mixture and continue stirring. Now you could keep the heat at maximum.
14.One it boils well, say 3-4 minutes switch off the heat.
15.Add the coconut milk-spice mixture ad mix well.
16.Heat 1 Tbsp ghee in a frying pan and fry cashews, raisins and coconut slices, one by one, till they turn golden brown and garnish the payasam.


Notes:

If you are using fresh coconut milk, first you have to add the 3rd pressed milk followed by 2nd milk.Use the first pressed milk (without any water)for mixing the spice powders.

Contributor: Namitha

Thursday, April 15, 2010

Kootu Curry (Mixed vegetables in coconut)

 Kootu curry is a mix of chick pea, yam and plantain in coarsely ground coconut.  The main flavoring of the dish is the fried coconut.   This dish is popular in North Kerala.  I learned this dish from a family friendthat  from Kannur.   Eating at her home made me realize with finality  that small changes in ingredients make huge difference.  I say that because she would serve a fish curry which is with a coconut gravy and I would expect it to be like something I have already tasted.  However, the minute I taste it I know I am wrong.  A little jeera or a little this or that I learned gives a totally different dimension.  Anyways, the crux of it is this dish may not sound very different from a sauted vegetable with coconut but once the vegetables are more of the starch protein variety and pepper and chili powder instead of green chilis come into play  you have a new experience.  Another of those dishes served in sadya it seems just apt to talk about it today.  
Ingredients:
Black Chana - 1/2 cup
Yam - 1 cup
Grated Coconut - 1/3 cup + 1Tbspn
Chili powder - 1 tspn
Turmeric - 1/2 tspn
Jeera - 1/2 tspn
Pepper - 4 - 5 pepper corns or about 1/4 tspn or as per taste
Salt - for taste


Method:
1. Soak chana overnight or atleast 6-7 hours
2. Pressure cook with a little salt till done
3. Cook yam with turmeric, chili powder and a little salt
4. Grind coconut coarsely with jeera and pepper corns
5. Mix cooked chana, yam and the ground coconut mixture and check for taste and salt.  Add pepper or salt if needed
6. Temper with 2 tspn of coconut oil, mustard, curry leaves, 1 broken red chili, curry leaves and 1 Tbspn of coconut
7. Mix well and serve with rice

Notes: You may add plantain to this dish.  There is also a version of green grams and pumpkin with the same coconut mixture which I will talk about in another post.

We talked a lot about Vishu and "Vishukkani" yesterday.Here is a picture of Vishukkani for you


Contributor: Sunitha & Namitha

Wednesday, April 14, 2010

Vishu Sadya & Happy Vishu

   Vishu  for Malayalees mark the beginning of an astrological new year.  April 14th is Vishu and celebrated all over Kerala.  As part of the celebrations and belief the day starts by opening your eyes to see a resplendent pooja room(a room or space dedicated for pictures of Gods and worship).  On Vishu one of the elders make it to the room eyes closed and once they have their fill of the sight he/she guides the rest of the family by cupping their hands over their eyes ensuring the groggy heads in the family make it safely to the pooja room.  The belief is, by seeing abundance on the first day of a new year you attract goodness year round.

  The ladies of the household delight themselves decorating the pooja room on Vishu eve.   Flowers, decorative silk, gold, vegetables and grains are arranged in front of pictures of Gods.  The copper lambs are scrubbed to a glowing gold and kept ready to be lit in the morning.  Everything that symbolizes prosperity is arranged benevolently thanking the Gods.  One of the central pieces of the decoration is the flower from the Golden shower tree, Cassia Fistula ( Konna poo in Malayalam).   This flower, probably because it’s yellow, the color of sun and gold is considered auspicious.   On vishu eve if you have a Golden shower tree in your yard you can be sure it will be bare of any flowers.  Everyone willingly shares the flowers with their neighbors and friends. Another, interesting point I figured out from wikipedia is that the flower blooms when the "sun is in its most exalted position"  With the golden colored lamps lit, gold jewelry, rich silk and beautiful yellow flowers all around, it's a vision to behold.  It’s soothing, peaceful and enlivening all at once.  From my knowledge gleaned from movies I have also seen mirrors kept in the room and my guess is this will be in the hope that family members will see each others smiling faces securing harmony in the bargain. After all, isn't harmony with family members sometimes the most difficult to maintain.  However, the real reason for the mirror is to see once own face as "kani" (auspicious sight) which is considered good in the whole scheme of things.

  I am glad I can write all about rituals and customs on a food blog and still not be digressing from the subject of  the blog.  Every festival or celebration is incomplete without food significant for the occassion.  The same is true for Vishu.  An elaborate lunch (sadya) is served on banana leaves with a multitude of savory and sweet dishes.  We do use cutlery and china in Kerala but on this day do away with them all and embrace our age old custom of eating on banana leaves.  It may not be easily doable for all but it's fun and exciting like you are in play.  On a serious note, being in the tropical region I guess it was practical to eat on banana leaves.  If you think I am justifying this custom,  I am not.  I am just telling you as ridiculous as it may sound to you we have fun eating on banana leaf seated on the floor.  Most people grow banana trees in their backyard.  If not we spend an extra rupee or two to enjoy the feast served on it.

   Today it's not a new recipe that we have for you but a spread of all the food you will need to serve a sadya.   Hope this repertoire, all in one place, will be helpful for you to make your own sadya this Vishu.  We at Collaborative Curry wish you love, health and prosperity this Vishu and always.  Wishing in Malayalam “Vishu Dina Ashamsakal”

Check here for more sadya recipes that are not listed below


Vazhakka upperi/Banana chips


Next is Sarkkaravaratti/Sweet chips


Next to the chips we keep small plantain (vazhappazham) and Pappad


Now it's time for pickles


Puli inji (ginger pickle)
 Kadumanga Achar/Mango pickle


Next to these we serve pachadis, both sweet and savory

Beetroot Pachadi/Beetroot in yogurt and coconut gravy


Pineapple Pachadi


Inji pachadi


Olan is the next one
Now the dry dishes like thoran (veggies sauteed with coconut)and Mezhukkupuratti( stir fries)

Cabbage Thoran


Vazhakka Thoran

Pavakka Mezhukkupuratti/Bittergourd stir fry


Kovaikka Mezhukkupuratti

On the extreme right end you will get Aviyal, the most important dry dish.Normally people judge the quality of sadya after tasting aviyal :-)


Did you get mad waiting for the rice ? But now you have all the side dishes served in front of you.We as kids (sometimes even now) finish off the things like banana chips and sarkkaravaratti by now :-)

Once the rice is served the gravies will be served one after the other, starting with parippu curry and ghee to go with it. Remember you already have the pappad on your leaf.

Parippu Curry

Pulissery/Kaalan comes next.


Once you are done with pulissery, more rice (if you want) and Sambar will be served.


Now the last gravy will be served ,buttermilk. But some people prefer to take this part at the very end, even after taking Payasam/Kheer


Normally there will be a milk based payasam and a jaggery based payasam.Sometimes even 5-6 different types of payasam will be served.

We hope you enjoyed this virtual feast :-) HAPPY VISHU !!!

Contributors: Sunitha and Namitha