This is a recipe that Sunitha had mentioned in her chicken cutlet post about a month ago. Which means today’s recipe has been in the drafts for quite a long time. I haven’t been cooking anything time consuming of late mainly because of laziness. But I continue to blame the weather for my lethargy !
Meat cutlets are a hot selling snack in Kerala bakeries. We have a couple of bakeries, near my parents ‘ home, where they sell the most delicious cutlets. Some days, the demand was so high the bakeries would run out of cutlets way before tea time, which is when we would have stopped by to buy some. Oh! the disappointment!
Another place and time from when cutlets got registered in my mind as a fantastic food was the hostel. Especially the one I stayed in while doing my pre-degree course. This hostel is in fact one of the best hostels where I stayed which served good food. I can say this with certainty because I have stayed in quite a few hostels during my college days. And beef cutlets in this place served was tremendous. Hm… I can almost taste it, writing about it.

Thursday lunch is when they served cutlets and Thursdays were always when the hostelites felt the hunger pangs the most. Well, hunger and a dying desire to eat the marvelous cutlets, of course. The hostel is about 5 minutes from the college campus but on Thursdays we would reach it in a minute. One cutlet per person, a dry dish with moru kachiyathu was the menu. Now, you will agree one cutlet for a person is never enough. For the first year, most of us savored every bite of this one piece we were doled out and remained sated. But the second year, we were bolder and demanding. With more friends, gangs had been formed and the human pack behavior was at it’s best. Some of us meat eaters had vegetarian friends and we plotted a plan. On Thursdays, we managed to get these poor souls to lunch at our table. I remember one girl a vegetarian by choice who sometimes enjoyed chicken but otherwise remained a vegetarian. We connived and pleaded with her to lunch at our table. She was a sweet heart and foregoing her special vegetarian food agreed to lunch with us. The lady who serve us, unaware of our antics would serve everyone at our table a cutlet each and as (The vegetarians and non vegetarians are encouraged to sit at their preferred place so that food can be served accordingly on each table). The unsuspecting served would serve this vegetarian friend a cutlet and the rest of us would hide our smile and wait for her to move on. As soon as the server was out of sight we would grab the cutlet from our friend’s plate. The ensuing fight for this one lone beef cutlet is too gory to let you in on the details. We never persuaded this friend to taste the cutlets ever , fearing she might turn over and be a fan herself. We were wicked!

But I have to tell you, the time in college and the hostels were the best times. I am still in touch with friends from that time but have lost contact with the sweet friend who let us rob her of the beef cutlet. I wonder how she is fairing without cutlets but as for me and most of my other friends we all still love cutlets! Whenever I make beef cutlets memories pour in from those days. Oh jeez! I am all nostalgic now, and I want some beef cutlets !
Ingredients:
Onions finely chopped- 1/2 cup
Ginger grated- 3 Tbsp
Garlic grated- 1 Tbsp
Garam masala- 2 tsp
Green chilies finely chopped- 4-5
Black pepper powder- 1/4 tsp
Curry leaves, chopped- 5-6leaves
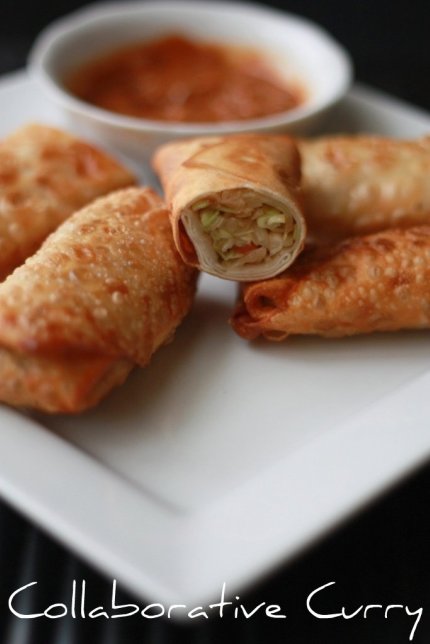
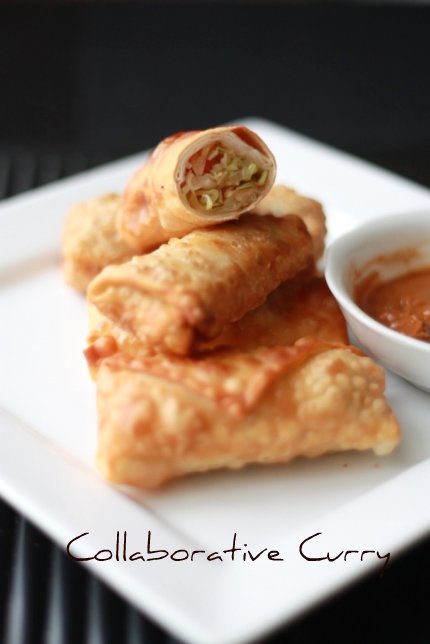
Ground Beef- 1 lb
Boiled potatoes- 2
Oil- 2 Tbsp + for deep frying
Bread crumbs from 2-3 slices
Slightly beaten egg- 1
Method:
1.Heat 2 tbsp oil in a wide frying pan. Saute the onions till translucent.
2.Add the chopped green chillies, ginger and garlic and saute for a few minutes.
3.Also add the garam masala and chopped curry leaves and saute.
4.Add the ground beef and mix everything well. Add a little bit (maybe 1/4 cup) water, cover and cook till the meat is done and all the water is absorbed.
5.Mash the boiled potatoes and mix with the beef mixture.
6.Heat the oil for frying the cutlets. When it is almost ready start shaping the cutlets.
7.Make small lemon size balls out of the mixture and press between the palms and make your preferred shapes, like oval, round,heart etc.
8.Dip them in the egg and roll in the bread crumbs and deep fry till both the sides are brown.
9.Serve warm with ketchup.
Notes:
1. You could use any meat of your choice.
2.If you don't have curry leaves, add some chopped coriander leaves instead.
3.Do not keep the shaped cutlets after dipping in egg for a long time. Fry them as soon as you can.
4.If you want to shape them and store for frying after a while, do not dip them in egg or roll in crumbs, do this step just before you fry them in oil.
5.The amount and flavor of ginger gives it the authentic taste. If you are using great quality ginger, use lesser than I mentioned in the recipe.(I never get ginger that has a flavor anywhere close to the ones we get in Kerala :(
I am sending these cutlets to this month's
Kerala Kitchen hosted at
Spoonful of DelightContributor: Namitha


.jpg)


