Showing posts with label Desi Sweets. Show all posts

Friday, December 30, 2011

Besan Ladoo and Happy 2012 !

Hope everyone is in the best of their spirits and health. What are the plans to welcome the new year? Midnight party with some dancing ? Preparing a list of new year resolutions? Whatever your plans are,I wish you a year filled with love,happiness,hope,and cheer! May the New Year gives the power and courage to make your dreams come true !

Besan Ladoo


Thursday, September 22, 2011

Rasmalai and 2 years of blogging


HELLO everybody! It's been a long time, isn't it? I know that for sure, because words don't flow anymore, and my fingers feel like lead as I type these words. Gosh! It's been long. Just in case you were wondering what kept us away, Sunitha made her big move to Canada, yoohoo! I am happy for her, and I got real busy with the kids. You know how summer holidays can be, right?! Swimming and day trips, hikes, shopping, just feeding them kids and all the other things that come with the territory. But behind all the chaos of our lives Collaborative Curry quietly turned 2 ! Are we proud! It's been a great journey so far in the blogging world and we love all our readers for staying tuned to this site. I read all the lovely messages you left me, and felt quite touched that you remembered and thought about us while we were away. Love you guys!

Rasmalai

Wednesday, July 20, 2011

Apple Rabdi/Rabri- Evaporated milk based Apple dessert

A big HELLO to everyone ! It has been a long time since we updated a post here. So much has been going on in our personal lives that the blog sort of took second seat. Although, one of the highlights during this time was that  Sunitha and I visited after 13 long years.  Those of you, who are our friends in Facebook might already know about that reunion. I was so busy with the preparations and planning. Sunitha is in the middle of a move and that is why off the blogging scene for a while. Sorry about that !

Apple Rabdi/Rabri


Today's post has been in my drafts for a while now.  Hopefully,  I will be back in the swing of things as far as blogging goes soon.  I am waiting for my children to finish summer vacation, general visiting, travelling and holidaying the family is involved in right now.  Coming back to the recipe, the whole inspiration behind making this dessert was Kulsum from Journey Kitchen.  She did a guest post on it.  I have combined her recipe and the traditional one but I must thank her for tempting me with her beautiful pictures.

Apple Rabdi

The preparation is very much similar to that of Basundi, if you haven't noticed.The main difference here is the presence of Apples.So if you love Basundi, just like me, you must try this !

Apple Rabdi/Rabri


Ingredients:

Milk- 4 cups/1 liter
Condensed milk-2 Tbsp
Sugar- 1/4 cup
Apples,peeled and grated- 3
Cardamom powdered- 1 tsp
Saffron- a pinch soaked in a Tbsp warm milk
Pistachios, blanched and slivered- 2-3 Tbsp

Method:

1.Boil milk in a thick bottom pan and cook until it is reduced to about half the quantity.
2.Add sugar and condensed milk and stir continuously for 4-5 minutes.
3.Add the grated apple and cook for about 4 minutes.
4.Add the cardamom and saffron. Mix well and switch off the heat.
5.Throw in the pistachios.Serve warm or cold.

Notes:

1.You could use condensed milk as a sweetener instead of sugar, just like Kulsum says.
2.It is better to use a sweet variety of apple for this preparation.
3.You could replace pistachios with almonds if you like.

Friday, June 24, 2011

Carrot Kheer/Payasam- Carrot dessert in milk spiced up with Cardamom

Some flavors blend so well you cannot tell them apart when together. Yet, together they are a flavor to reckon with. In the same way, if I served you the golden sunshine in the bowl below, and asked to describe its taste, you will be torn unable to decide if it is carrot halwa or semiya payasam.

Carrot Kheer/Payasam

The answer is right here on this page so please read on. You will agree with me on this when you go through the recipe. In the same breath I have to admit that it is better or equally good as carrot halwa or a payasam

Carrot Kheer/Payasam

I made this a month back and decided to post it only when I had some fresh carrot pictures to post alongside. Obviously, that never happened. The farmer's market doesn't have a good variety of veggies yet, and the carrots that I've planted this season are not ready for harvesting. Then again, when I remembered the bunnies that frequent my vegetable patch, I doubt they will leave any carrots for me to photograph. Everything considered, I decided today was the day to share this pleasantly surprising sweet delicacy with you. At a later time, provided the regular visitors in our yard, the Bunnies, leave some carrots for me to enjoy I shall share some pictures with you.

Cardamom/Elachi

Speaking of carrots, did you know that most of the baby carrots we get in the US is processed, and "not so baby" carrots? I didn't know this until Sunitha mentioned it once. But there are some varieties that is "baby carrots, " albeit too expensive. The stats shows how consumption of carrots have grown exponentially post marketing baby carrots. And surely consumption shall soar once everyone knows how to make kheer or carrot halwa :-) You will agree 100 % after you have tasted some kheer yourself!

Carrot Kheer/Payasam


Ingredients:

Ghee- 2 Tbsp
Carrot grated- 2 cups
Milk- 2+1 cup
Sugar- 1/2 cup
Cardamom powder- 1 tsp
Almond slivers- 2 Tbsp


Method:

1.Heat 2 Tsp ghee in a deep and thick bottom pan.Throw in the grated carrots and fry till it is cooked through.
2. Pour in 2 cups of milk and allow to boil.
3.Lower the heat and let the carrot get cooked well.Stir in between. It takes almost 10-12 minutes.
4.By this time almost all the water content will be dried, do not add more milk at this point.
5.Add sugar and start stirring continuously, on low heat.Continue this till all the water gets evaporated and the mixture gets thickened.While stirring if you are able to see the path of the spoon/spatula without the mixture running over there immediately, it is done. This takes ~10- 12 minutes on medium low heat.
6.Slowly add the remaining milk into it. The point is that the boiling shouldn't get stopped while you pour the cold milk.This can be done on high heat and stirring continuously, while you add around 1/3 cup of milk at a time.
7.Once you added the milk, it should be boiled well.Pour more milk to get the desired consistency.Add the cardamom powder. Switch off the heat.
8.Garnish with slivered almonds. Serve warm or cold.

Notes:

1. You could reduce the sugar and add some condensed milk instead.
2.Also you could add some evaporated milk along with the normal milk after you boil with the sugar.

Monday, May 2, 2011

Unnakai - Ripe plantain filled with dates and nuts

I had given up dreams of wearing flip flops. Then Saturday happened. Glorious sunlight and suddenly everything seemed possible. We found out state parks and walkways near by and marauded them. Breathed fresh air and drank in the verdant beauty all around. Hm...! Nice. Am I glad or am I glad! I wore my flip flops too.

Unnakai

The fruity treat today called unnakai is a Malabar specialty. I have seen it in many blogs and had to try it myself. We are huge fans of plantains at home so decided it won't go waste. Making a sweet treat is quite a hefty decision these days. It's no good for me but my husband loves them. The only balance I can strike is to make only for him and resist it myself but that is asking a lot. But with plantains I decided its going to be okay. And it sure is. I have stayed away from the coconut filling which traditionally is the filling and instead used dates and cashews.

Unnakai

They are delectable
Unnakai

They are irresistible. If I say so myself!

Unnakai

Ingredients:

Plantain – 2, cut into four pieces, skin on.
Dates – 15
Water – ¼ cup
Cashews – 10 – 15
Brown sugar – ¼ cup
Butter – 1 tspn
Oil – to shallow fry

Method:
1. Make slits over the plantain peel randomly making sure the gashes are ‘skin deep’
2. Steam it to soften
3. Cool, peel and cut each piece lengthwise and seed them.
4. Mash to a pulp
5. Stew the dates for about 5 minutes. Remove from the liquid and chop into fine pieces.
6. Chop the cashew and sauté in 1 tspn butter and add the dates and brown sugar and switch off the heat. Set it aside
7. Make 8 equal parts of the mashed plantain.
8. Grease your hands with oil, take one part plantain into your hand, flatten it, and fill with enough date and cover over the plantain to make cylindrical shapes. Follow with the rest of the plantain and set aside
9. Heat a pan for shallow frying, add about 4 tbspn of oil, and slide in the shaped plantain. Turning carefully brown on all sides. Serve as a dessert.

Friday, November 5, 2010

Boondi Ladoo/Bundi Laddu - Being Festive

Hope you all are having a wonderful day,wherever you are. I thought it's not fair if we don't share the second sweet I prepared for Diwali, before the festival is over. So here is the boondi ladoo, my most favorite of all ladoos.We would love to say that again, Happy Diwali and we love you all !

I was in Middle School when I first had home-made Boondi ladoos.  My  Iyengar girl friend, (J), used to bring stuff like this to school all the time, and it was from here that I first had  ladoos.  Most of my class mates looked forward to being invited to her house for any celebration  because we knew there  would be all these delicious, juicy sweets to gobble up.  Other than ladoos, her mother could make Kerala Jilebi(Jangiri), pedas and a host of savory snacks.  My visit to her place was always memorable and quite productive.  I could eat all the home-made sweets I wanted,  and also borrow seedlings of "kanakambaram" for my garden.   Oh yes! Her mother was a great cook and an even better gardener.  I had the orange kanakambaram for a long, long time in my garden thanks to J!  My inspiration to make ladoos at home is J’s mom, but who would have imagined it would take X years to actually try it at home!

  When I was pregnant with my son, my second child, I craved ladoos to no end.  There was not a place I could buy good ones  where I stayed, and I decided to go all the way and fry it myself.  Being huge with a belly, it was not easy, but I persisted.  I know how this might sound foolish, and I don’t recommend pregnant women trying to fry and burn their belly  unless you can be careful and get it done.  I tell you what, when desire strikes no bump is a hurdle ;)

  Now for a couple of years, I have been making ladoos on and off. I am glad to present to you a fool proof recipe.   

Disclaimer: You don’t  have to be pregnant to try this for the first time ;)

May the festival of lights brings you all the happiness in the world !

Boondi Laddu/Ladoo

These ladoos are so delicious and exactly like the store bought one, except for their shape ;-)

Boondi Laddu/Ladoo

This for you all,with good wishes and love, from us !

Boondi Laddu/Ladoo


Ingredients:

Besan/Gram flour- 1 1/2 cup
Rice flour- 1 Tbsp
Baking soda- a pinch
Oil- for deep frying

For the sugar syrup:

Sugar- 2 cups
Water- 1/2 cup + 1 Tbsp
Cardamom powder- 1/2 tsp
Cloves, crushed- 6-7
Cashews and raisins- lightly fried in ghee(optional)- 2 Tbsp each

You need a boondi strainer/a strainer with holes for making the boondis

Method:

1.Make a medium thick batter with the flours, water and soda. The consistency should be lighter than of idli batter.If it is too watery you will get boondis with a tail. If it is too thick it will not come through the strainer.So adjust it if required after you try the first time, by adding the flour or water.
2.Heat oil in a deep frying pan.Keep the heat on medium and by holding the strainer over the oil, pour a ladle full of batter onto the strainer.Make circular motions with the bottom of the ladle, just like you do when you make a dosa.The flour will drop into the oil and get fried.
3.It doesn't take long for the boondi to get fried. Also you don't have to fry the boondis till they turn brown, as you do for making mixture and other snacks.As soon as you stop pouring the batter stir the boondis well, so that they don't cluster together and burn. (it's always nice to have an extra pair of hands at this time, but I did it all myself this time !)
4.Drain them on a paper towel. Also it's wise to use a big strainer to take them out from oil, since the boondis are small but large in number.
5.Make the sugar syrup by mixing the sugar and water in a thick bottom vessel and boiling it to one string consistency.This doesn't take long if you add only this much of water.
6.When it has reached one string cosistency, add the cloves and cardamom and also the cashews and raisins. Mix well.
7.Throw in the fried boondis into this syrup and mix everything well.
8.Let it cool for a while so that you can handle it without burning your hands.
9.Make balls out of this before it gets completely cool.
10.Let the ladoos cool completely before you store them.

Do you think that it's a lot of work? But believe me, it's all worth it :-)
Once again we wish you all a very Happy Diwali/Deepawali !!

Boondi Laddu/Ladoo

Sending this to the event "The 30 best recipes of 2010" at Chacko's Kitchen.Thanks Susan and Abraham for hosting such a wonderful event !

Contributor: Namitha

Thursday, November 4, 2010

Pista Burfi and Happy Deepawali !

Happy Deepawali!!!!!!!!!  How are your Deepawali preparations going?   I am sure you all have filled your boxes of sweets and other goodies to share with friends and family.  In this joyful festival of lights, we join to wish you all a very happy and safe Deepawali.

  Growing up in Central Travancore, Kerala, I grew up without any firecrackers and lighting of lights as part of the festivities for Deepawali.  But you better believe sweets were always a part of our Deepawali, and I continue to keep that  tradition alive.    Every Deepawali I make some for my family. 

  My most favorite Deepawalis were celebrated while I was in Hyderabad - hours together with firecrackers, partying, sweets, the works!  If you are from that part of the world, I want to tell you a special thanks for giving such great memories.

Sunitha and I wish all our friends and readers a Deepawali full of fun !!

Pista Burfi

I didn't use any food colors,that's why the color is not great

Pista Burfi

But it tastes wonderful and my lil one finished at least half a dozen pieces while I was clicking away :-)

Pista Burfi

Ingredients:

Unsalted Pistachios, blanched - 1 cup
Sugar- 1/2 cup
water- 2-3 Tbsp
Cardamom powder- 1/2 tsp
Ghee- 1 to 2 Tbsp

Method:

1.Blanch the pistachios by soaking them in hot water for about a minute and washing in cold water,slip out the skin.
2.Dry them on a paper towel. Grind to a fine paste, without adding any water.. (I like it to be a bit coarse)
3.Prepare a cookie sheet or a plate greased with ghee.
4.Heat the sugar in a wide, preferably non-stick pan after adding 2 Tbsp of water, just enough to wet the sugar.(The more the water the more time it will take !)
5.Let it boil and come to one string consistency.If you think that you have overdone, add a little more water and do it again.If you add this amount I've mentioned it won't take long after it starts boiling.
6.Add the ground pistachios and stir well.
7.Slowly add the ghee and stir in to incorporate.If you are using a non-stick pan you need to add only 1 Tbsp ghee.
8.When the mixture starts leaving the sides add the cardamom powder and mix well.
9.Switch off the heat and spread the mixture onto the greased plate or baking sheet.Use a greased spoon /rolling pin to even the surface.
10.Let it cool a bit and cut into desired shapes. Cool them completely before storing in an airtight container.

Happy Deepawali one again !!

Pista Burfi

Notes:

1.The amount of sugar is to our liking.(In fact I added a little less than 1/2 cup!)It was perfect for us.If you like your sweets to be extra sweet you might
want to add a little more sugar.
2.If you want to add green color, add it to the sugar syrup, before adding the pistachios.
3.If you have edible silver foil/varak spread it onto the top after you even the surface.

Contributor: Namitha

Wednesday, September 8, 2010

Aval Payasam/Rice flakes or beaten Rice Pudding

Today’s is a recipe that took shape in 1960’s or maybe even earlier in my family.

It has been a while since we posted old recipes, hasn’t it? Hopefully, this one will change that and intrigue you enough to be included in your collection of ‘antiquities’. Valiyachen (my maternal grandfather) handed down this recipe for payasam to my father. Well, there is no hand-written-yellowed copy of this recipe to boast. However, like all Indian recipes learned by observing. My father learned it from –Valiyachen- and my sister and me from our father. And now, it makes me quite happy to share this treasure with you. Life cycle of a recipe! Huh!

I cannot help but say a little more about Valyachen. He was an avid cook. He was so good; I think he was better than my granny or mom. (I will have to convince my mom I don’t mean that). Valiyachen's industry is well known; running a business, laboring in the paddy-fields with the workers, cultivating thil/gingely/ellu and beans (urad) as in-between crops (crops done in-between paddy season), and cooking too. He was multi-talented. 
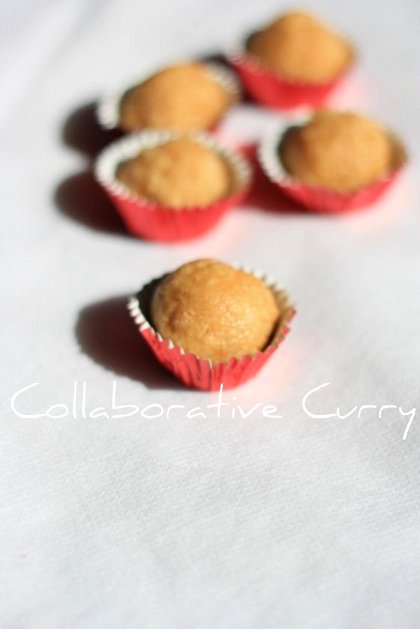
The thil (sesame) yielded from his fields he made into ellundas(jiggery sweetened sesame balls). From the yard – kitchen- mouth, can you imagine! Oh! The taste!
We lost him to cancer when I was just knee high. His memory thankfully is still fresh in my mind. Conversely, his image flashes in my mind like a framed painting; young man standing tall in his white dothi and plaid shirt, both hands busy with totes brimming with goodies, like ellunda,achappam ,upperi etc. His smile was the brightest growing ear to ear spotting us running to him when he visited. He adored and spoiled us and we loved him back with equal strength. I tell you, it amazes me even today how, in a male dominated society he was such a gentleman helping granny in the kitchen and being so adorable all at once.
My mom says grandpa made payasam, whenever it took his fancy. He never bothered to have a reason to celebrate (which is generally when payasam is made). My father takes this cue and does the same these days. I encourage you to do the same.

During my vacation in Kerala we cooked some together, reminiscing about Valiyachen and had a pleasant time. Whilst my children were making their childhood memories I refreshed some of mine!

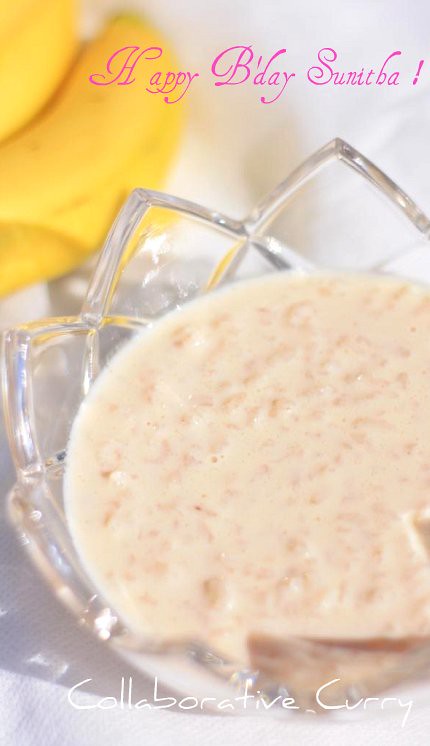
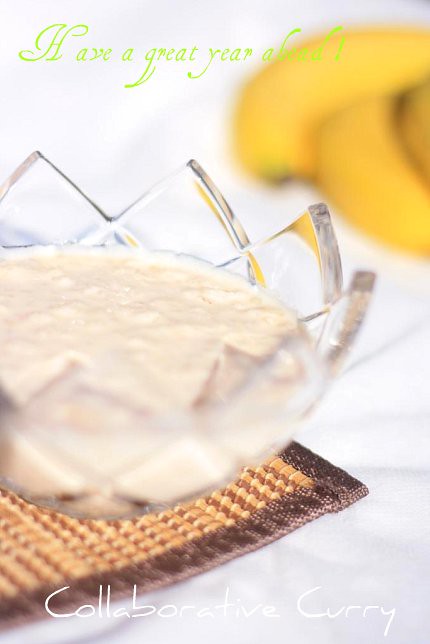
I agree there is no need for a reason to make payasam but this post coincides with my sister and her daughter’s birthday. Therefore I take this opportunity to wish them both all the love and happiness. Chechi (as my sister calls me) is sharing this payasam with you all to celebrate my lil sister.


Aval Payasam

On a different note, there was a big wildfire in Boulder 2 days back. Some of you might have seen it on tv.Many families lost their houses though almost everyone is safe.About 3,500 acres is burned,8 people are missing and 90 structures are charred. All good thoughts and wishes to those who are affected and the firefighters who worked continuously for 2 days.

Ingredients:

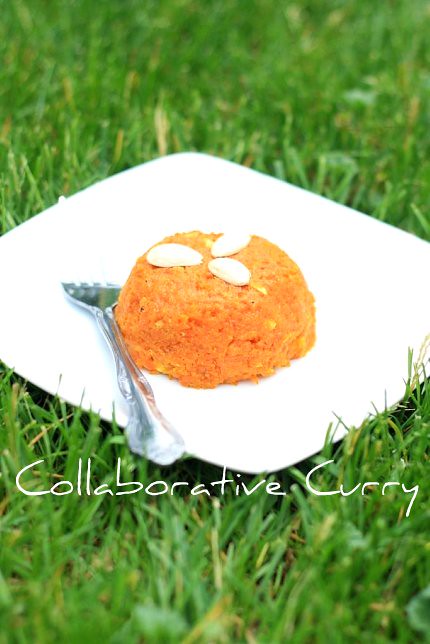
Aval/Poha/Rice flakes-100g/1cup
Jaggery/Sarkkara- 200g/1 1/2 cup(1 medium sized ball)
Ghee-1 Tbsp+1 Tbsp
Coconut milk(first pressed milk)-From one med size coconut
Coconut milk(second pressed milk)-From one med size coconut(~4 cups)
Cumin/jeera powder-1 tsp
Cardamom powder-1/4 tsp
Dry Ginger powder-1 tsp

For Seasoning:

Cashews-2 Tbsp
raisins-2 Tbsp

Method:

1.Heat ghee and fry the aval till it turns golden brown by stirring continuously.
2.Melt jaggery after adding 2-3 Tbsp of water and sieve it n another pan.
3.Keep a thick bottom pan and pour the melted jaggery into it. Once it is heated up, add the fried aval and stir it continuously for about 20-25 minutes. Add a little more ghee in between.This is to combine aval and jaggery well.
4.Add the second pressed milk and cook well, stir continuously.This may take about 5-6 minutes.The consistency should be sightly on the watery side. Otherwise it gets thicker after you add the first pressed milk and the spices.
5.Meanwhile mix together the first pressed milk and all the spices without any lumps.
6.Switch off the heat and add the coconut milk mixture and mix well.
7.Fry the cashews and raisins in ghee and add into the payasam.

Aval Payasam

Notes:

1.We used the Brown aval, but you could use the white one too,but use the thicker one.
2.You could replace a part of the coconut milk with the regular milk.
3.If you have never made fresh coconut milk, this note is for you :-).You have to squeeze so hard to take out the fresh first pressed coconut milk without adding any water. Once you are done with this, add a few spoons of warm water and grind it in a mixer or blender and press out the second coconut milk through a sieve.

Contributor: Namitha

Monday, August 30, 2010

Pista Kulfi/ Pistachios icecream

  Ha! Now Kulfi needs no introduction does it?  Some things evoke the child in you and kulfi definitely does that for me.  I had my first kulfi on an excursion outside Kerala and then on quite hooked. I love most Indian desserts like kalakand and burfi etc but this one has a special place.  It conquers all, takes the icing on the cake really, because its frozen.  Like most people I love ice cream and so does my children.  This is an ideal way to taste an Indian dessert and fall in love.  Hopefully, you agree. I am rambling.

  A fun of another sort I am having these days is listening to my son.  Entertainer.  His father was absolutely in splits listening to him say 'Buhmb' for Urumb (meaning: 'ants').  I adore this phase of my son.  As rowdy as he is, when he makes up these words and says it with carefree, abandon, cool as if  he is right!  Confidence.  Love it now but maybe not if he was a teenager. Worries for another time.

 Today, let's enjoy the small wonders the day brings and lick up some mouthwatering, lip smacking, rollicking goodness of kulfi. Oh.. what fun and such beautiful memories this dessert evokes.  Don't you agree?

  If you have not heard of this dessert: it's similar to ice cream except not whipped to a fluffy consistency.  Milk is cooked down and frozen to make a dense ice cream.  Pisatchio's,  I think are the most common flavoring agent but you can make many variations.  Let that imagination run wild!   I have done mine today with pistachios.

Forgot to ask: Hope you are doing well and had a jolly weekend.

Now, shall we go on and have some 'njummy, ammi kulfi' like my son would say...okay!


Pista Kulfi

Ingredients:

Milk- 4 cups/1 liter
Condensed milk- 1/3 cup
Sugar- to taste
Pistachios- 1/4 cup
Cardamom powder- 1/2 tsp

Method:

1.In a wide and (preferably) non sticky pan boil the milk till it reduces to one third of its quantity.
2.Do keep stirring in between and scrape down the sides. It took me about 20 minutes for get this done.
3.Meanwhile grind/grate pistachios coarsely.
4.Once the milk is reduced to one third, add the ground pistachios and condensed milk and cook for 2-3 minutes.Keep stirring.Add the sugar too if you are adding any.
5.Switch off the heat and add the cardamom powder and mix well.
6.Let it cool for some time and pour into kulfi mold/pop mold and set in the freezer for at least 4 hours.If you are pouring into a big bowl ,then let it sit longer to set.
7.Serve after garnishing with pistachios slivers.

Pista Kulfi

Notes:

1.Be easy on adding sugar since you are adding condensed milk.
2.This recipe gives ~6 servings.

Monday, August 23, 2010

Boli with Paalpayasam to wish you all a Happy Onam !!

Happy Onam to you!! This day brings back good old memories and my tongue tingles with the taste of good food.  It takes me to the fastest swing my late Grandfather made for us children.  It reminds me how we pestered him until the swing was made.  How, being the eldest amongst my cousins I decided who gets to swing the swing first.  Those were the days.

  Onam meant family reunion.  Cousins from all over the state and country made it to our little town where my grandparent lived.  I next door.  The time other than summer vacation I met my cousins.  We exchanged secrets, played hide and seek and hopping and skipping.   Onam morning we headed out at dawn to pick flowers and make "athappokkalam" the flower carpet  The front yard would be embellished so to speak.  I don't see those flowers anymore in our neighborhood.  Those days are past.  The days of "thumbapoovu"( white beautiful small flowers)"mukkutti"(yellow small ones) "onappovu"(lilac with big petals).  However, the memories are etched in me to never go away.

  It's a day of abundance, color, food and and merry making in my small town.  I hope to spread that cheer to you.

Boli and Paalpayasam

It has been ages since we had celebrated Onam with all the family members and I miss that a lot.But still I make sure that my small family gets a miniature version of it, every year.This time I decided to make this special dessert which goes perfectly well with paalpayasam, Boli, which is usually served in marriage feasts/sadya.

Boli/Holige/Obbattu/Bobatlu/Puran poli is all the same, Boli being the name of this dessert in Tamilnadu and Kerala.

Ingredients:

Channa dal/kadalapparippu- 1 cup
Sugar- 1 cup
Ghee/clarified butter- 2-3 Tbsp
Nutmeg powder- 1/8 tsp
Cardamom powder- 1/2 tsp
All purpose flour/Maida- 1 cup
Yellow food color- a few drops
Salt
Gingely Oil- 2 Tbsp
Rice flour- enough to roll the dough

Boli and Paalpayasam

Method:

1.Pressure cook the channa daal with a pinch of salt.
Knead the dough with salt and food color to a smooth dough. (the dough should be looser than the poori dough.)Bring together the dough to form a big disc, and pour the gingely oil on the top of it so that the dough is completely covered in the oil.Keep it aside for at lest half an hour.
2.Drain any excess water from the cooked daal.
3.Heat a tablespoon of ghee in a nonstick pan. Saute the cooked daal with sugar until all the water gets absorbed.
4.Now add the nutmeg and cardamom powders into this and mix well.Switch off the heat and let it cool.
5.Grind this mixture in a mixer grinder without adding any water to a smooth paste.
6.Make lime sized balls out of it.
7.Take a small portion of the dough, say gooseberry sized, and press it on the palm to get a small poori and keep the daal ball in it and cover it up.Just like you would do to make parathas.
8.Now roll it carefully on a floured surface. It's best to use rice flour for flouring.
9.Cook this on low heat on a tawa until both sides are cooked.
10. Do not overcook or let the sides brown.While turning the sides brush a little ghee on both sides.
11.Seve with paalpayasam or serve as it is.

Boli and Paalpayasam

Notes:

1.This recipe gives you around 15 boli.
2.You could also add 1 tablespoon of gingely oil in the ghee and knead it all together and cover up the dough before you roll them out. But I have found that this method is more easier.
3.Check here for the paalpayasam recipe, which I posted a couple of weeks back.

Here is the picture of an "athappokkalam" which was taken during the Onam celebrations in Hyderabad a few years back, to wish you all a Happy and Proseperous Onam !!!

Happy Onam

Contributor: Namitha

Tuesday, July 27, 2010

Paal Payasam/Rice Kheer to say "Happy B'day Sunitha" !

Dear Sunitha,

I wish for you to have people to love, people in your life who will care about you as much as I do. Happy birthday dear !


Dear Readers,

I wanted to make something special for Sunitha to wish her on her birthday and to let her know how special she is to me .So here is her favorite payasam and I would love to share this virtual treat with her and also with you all. I hope you all will join me in wishing her a very happy Birthday.

Everyone in my family likes pal payasam and I'm sure you will also love it. I am giving you the easiest and simple pressure cooker method and the original method.Believe me, both tastes the same. But it is all up to you, whether to follow the contemporary or authentic approach:-)

Ingredients:

Red Rice (unakkalari) - 1/2 Cup
Milk (whole milk)- 5 Cups
Sugar- 1 Cup
Ghee (optional)- 2 tsp

Method:
In pressure cooker:

1.Clean the rice by rubbing it on a cloth.If you are a cleanliness freak, wash the rice (quickly, don't soak it even for a minute!) and dry it completely before making payasam.
2.Throw in everything together in a cooker and let it boil, without the weight on.
3.When the steam starts coming keep the weight on and reduce the heat to medium low/simmer.
4.Let it sit on this heat for about 40 minutes.(no single whistle during this time)
5.Switch off the heat and let it sit for at least 2 hours before opening and transferring the payasam to serving dish.The more you keep the more pink color you will get.


On Stove Top:

1.Clean the rice as I have explained above.
2.Heat the ghee in a thick bottom pan and trow in the rice to saute for 4-5 minutes on medium heat.
3.Add 3 cups of milk and 1 cup of water and let it boil.
4.Once the milk starts boiling reduce the heat and let the rice cook well, but not mushy.This takes about 30-40 minutes depending on the variety of rice you use.
5.When the water is almost absorbed, add the sugar and keep stirring till you get a clear path behind the spatula you use to stir.This takes about 15 minutes on medium low heat.The more the time the more tastier it will get .(Then you should keep it on medium low heat )
6.Pour the remaining milk slowly after keeping the heat on medium high and let it boil after each addition.
7..If you want to have more watery consistency then you may add more milk.


Notes:

1. The authentic recipe doesn't call for any cardamom, cashews or raisins.But feel free to use it.
2.You could replace the red rice with Basmati/Sona Masoori/Long Grain rice varieties.But you will not get the dark pink color.
3.After preparing the payasam gets thicker once it cools down. You could adjust the consistency at any time by adding boiled milk into the payasam.

Friday, July 16, 2010

Carrot Halwa

I thought I will start with a sweet note to say hi to all of you. God, how much I missed you all and your yummy delights. India was wonderful with rains and lots of food.Still we are unpacking and settling back to normalcy.Kids are sick and we may not be able to upload everyday for some more days. Sunitha is shifting to a new place this weekend and she needs some time to settle in. I wish her all the very best in the new place and hope she will find out some new friends soon.


Ingredients;

Grated carrot- 2 1/2 cup
Milk- 2 Cups
Sugar- 1/3 cup or to your taste
Ghee/Clarified butter- 1/4 cup
Cardamom- 1/2 tsp
Nuts- for garnishing


Method:

1.Boil the milk in a pot till it gets reduced to 1/3rd of its quantity.Stir in between while doing this.
2.Heat a non sticky pan and add the ghee, throw in the grated carrot into this and saute for a few minutes on low heat.Keep stirring for a few minutes, until the carrot is cooked. This takes around 7-8 minutes.
3.Pour the evaporated milk over this and cook ,keeping the lid on for a few minutes.
4.Add the sugar and mix well.Continue to cook for some more minutes, or until tall the water content is evaporated.
5.Sprinkle the cardamom powder and mix well.
6.Take this in a serving plate and garnish with slivered almonds or any nuts and raisins.


We are happy to send this to Nivedita's event "celebrate sweets- Halwa "
Thanks for hosting such a cool event Nivedita :-)

Contributor: Namitha

Thursday, June 24, 2010

Microwave Peda

I have tried this at several occasions especially when I have surprise visitors.  It is quick and easy to make and super delicious.  Who will not love a dessert that can be made in 10 minutes.  I got the idea for this recipe from the internet a long while back.  I would like to give the credit to the blog which I have misplaced now but as soon as I have it will update this page with the link.


Ingredients:

Sweetened condensed milk- 1 can
Ghee- 1 Tbsp
Yogurt- 3 Tbsp

Method:

1.Mix all the ingredients in a microwave safe bowl .
2.Keep this in the microwave oven at high for 2-3 minutes and mix well.
3.Put the bowl back and repeat this mixing every 2-3 minutes until the peda is done.
4.This will take 10-12 minutes depending on the efficiency of your oven.
5.Let it cool for a while and roll out the peda, or make desired shapes.


Contributor: Namitha